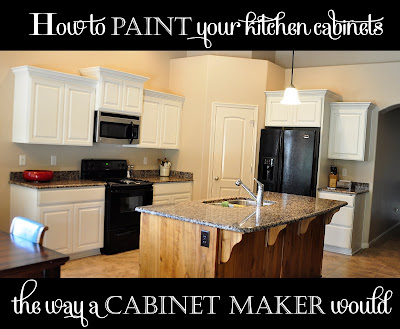
I promised it wouldn’t be long before the tutorial was ready on how to paint your kitchen cabinets. I have worked hard to include all the information that you will need to do a professional job, so beware, this post is going to be LOOOOONG. It’s ok, when it’s time that you need the instructions, you will be glad.

I will first talk about the prep work, the list of supplies you will need, and finally the techniques you will need to complete the task of transforming your kitchen.
All of my information on this project is from Shawn from Aspen Mill. A good friend and an AMAZING cabinet maker. He does amazing work and made me an unbelievable TV frame for Jill’s house. He agreed to teach me the “RIGHT” way so that I didn’t steer anyone in the wrong direction and cause thousands of dollars in damage. This project has been in the works for months and months, and I’m so glad that Shawn was on board. {You can help thank him by checking out his shop}.
First off, the kitchen is the most important room in your home, at least it is in my home. It is the gathering place. It is used every day, all day. You deserve to have your kitchen look like YOU want it to look. One thing I have found about painting kitchen cabinets is that EVERYONE {and their dog} has something to say about this decision. They even think their opinion counts {gotta love ‘em, but it doesn’t.} So, if your dream is to have purple cabinets with a coral glaze, go for it. I might even look at you a little wonky, but who cares. You can have whatever color of cabinets you want. Kapeesh? Don’t let anyone talk you out of it.
But, now that we have established it is YOUR decision, don’t do it without doing it RIGHT. I don’t want you to paint your cabinets unless you commit to doing it correct. I want your kitchen to look like your cabinets were ORIGINALLY that color. I don’t want brush marks, or painted over hinges. I want you to do it professionally so that you aren’t mad at yourself in a year from now. Let’s start learning how.
Step One: Take before pictures and unpack your kitchen, you will need to remove everything from your cabinets too. {Empty those bad boys}.
Step Two: Gather supplies:
Drop cloths {we used canvas drop cloths inside and plastic out in the garage,
a rented paint sprayer {this one looks like the one we had,
Tinted pre-catalyzed lacquer, We bought ours at Jones Paint and Glass.
Clear Satin pre-catalyzed lacquer, Amazon is just coming out with this product, but I’m not sure if it’s the correct sheen. I just posted a question to find out.
Klean-strip Sander Deglosser {also found at the Home Depot},
lint free cloths,
oil based tinted glaze {optional},
a painting mask {absolutely NOT optional},
about three rolls of painter’s tape,
One roll of brown paper, 2X4s,
a few 5 gallon buckets {or boxes},
wood putty,
a screw driver,
a cordless drill,
painter’s tape
and a small compressor.  I know that I’m going to be flooded with questions about brands…etc. so I have put together a picture gallery to help. I also don’t want you to get held-up on the project if your paint store offers a different kind of lacquer..etc. Ask the professionals. They will know which paint sprayer you need to rent. They will know which lacquer is going to be the best choice. The items in the picture are the products that Shawn from Aspen Mill recommended to me.
Step Three: Begin with the prep work. Start disassembling the cabinets and remove the doors, drawers and hardware. Put all the hardware in a safe place. We used a ziplock baggie for all the screws and hardware.
Step Four: NUMBER EACH CABINET in a way that you will remember where each one goes when you get done. We took apart the hardware and put a small number where the hardware was going to be installed again. We even put a small piece of painter’s tape over the number so that it wouldn’t get painted.


Step Five: Place your drop cloths on the ground, and the 2x4s on your 5 gallon buckets {or boxes} for the cabinet doors to sit on.


Step six: Tape off the kitchen with your brown paper and painter’s tape. Be picky and make sure that your painter’s tape is perfectly aligned and press hard to make sure it is doesn’t peel up. It helps if you put the painters tape BEHIND the cabinets a little along the edge. If you have the ability to do so, I recommend it. Be careful if you have to climb.


You also need to tape around the floor and the inside of your cabinets. Nicole and Justin {my cousins who own this awesome kitchen} wanted to leave the island wood. I love mismatched looks so I loved the idea.

Step seven: Wipe down all the cabinets with Klean-Strip Sander Deglosser {let dry} and sand lightly with Superfine sanding pads. This step prepares your cabinets for the tinted lacquer {the white}. Shawn says that some cabinets {especially old ones} can have a funky reaction when painted. Cleaning them with the deglosser takes off all the dirt and grime and helps prepare the surface. The sanding pads rough up the surface a bit to help the lacquer adhere.


Step eight: Wipe off the cabinets with a dry cloth, and spray off the dust with a small air compressor. Again, if you try and paint your cabinets with dust on them, it will not adhere. So you need to be careful to get all the dust off prior to painting.
Step nine: Paint a light coat of tinted lacquer on your cabinets. Go slow and be careful to not put too heavy of coats on. Lacquer is as thin as water and it comes out perfectly smooth, if you put on too heavy of a coat it will drip. Don’t worry if this happens, I will show you how to fix it, but if you take it slow you will prevent a lot of these mistakes.  Your lacquer will dry in about 20 minutes. It goes FAST when you get to this point, but beware, you absolutely need to wear a mask. The fumes are insane. In fact, if you are living in your home while you are painting your cabinets, you should consider going to a hotel for a day or two.
Step ten: After you have painted a light coat of color on your cabinets and it is dry, you will see every imperfection perfectly. You will see nail holes that you didn’t know existed. You will see knots in your wood. You can now decide if you want to fill them with putty or not. We filled all the nail holes but we liked the knots. So, we filled the nail holes and left the knots. Let the putty dry completely before moving on to step eleven.
Step eleven: Sand lightly again with superfine sanding pads. Then wipe down again with lint free cloths. Spray them with the air compressor to make sure all the sanding dust is off.

Step twelve: Turn into a robot and repeat. Yep. paint. another. coat. {said in a robotic voice}

Don’t forget to do both the front and the back of your cabinet doors. {P.S. Be extra careful to let the doors dry COMPLETELY before you turn them over…they will stick if they are not and you will be super upset because you will have to sand and re-paint…yep speaking from experience here.}
Step thirteen: Sand, wipe off, and spray off the dust with the air compressor {yes in between every coat}. After the cabinets are completely painted, do a quick check to see if any touch ups need to be done. We marked the spots with painter’s tape and did one last touch up coat.
 Step fourteen: Sand, wipe off, spray off. Dude, you are going to know how to do these next couple steps with your eyes closed because you guessed it…IT’S the SAME!
Step fifteen: Now’s the time to change out the tinted lacquer for the clear lacquer. Make sure you get instructions on how to do this because you will need to rinse out your sprayer {hose and all} with lacquer thinner. Then, you will put in the clear lacquer and start spraying coats of clear coat.
Step sixteen: Spray a light coat of clear lacquer on your cabinets. Be careful not to create drips and smudges. But if you do, it’s ok. I’ll teach you how to fix them.
Shawn said, “You can go a little heavier with the clear coat than with the white.” So, I took that to heart and made a HUGE mess. It was a disaster.

To fix drips and smudges, let the paint/or clear coat dry completely, sand with 220 softly until the smudge cannot be seen. Be careful not to push too hard because if you take off the paint you will have to put more white on {and THAT is no fun because you have to change out the clear coat in your sprayer for white and then change it back to the clear coat when you are done…yes I’m speaking form experience here}. After you can no longer see the smudge or drip, sand with the superfine sanding pad to make it soft again.


Voila! Your smudge is gone and you can move on. PHEW. I wanted to cry when this happened, but don’t panic.

Or if you are like me, you will have a BAD mistake to fix. {Don’t tell Justin and Nicole, they weren’t here for this part}…oh wait. I think I just let the cat out of the bag.
 Yeah, it was terrible. Tears almost came at this point. My excuse? I couldn’t see very well because I didn’t have a light on that side….it dried, and I had to sand off the entire disaster. Again, I used 220 grit sand paper and pressed softly. Don’t push too hard or you will take off the white.
  Then use a superfine sanding pad to soften it up again.
  Voila, don’t panic it will all be ok in the end. 🙂
 Step seventeen: Glaze your cabinets {if you choose}. We did a light gray glaze on the cabinets to add a subtle charm and they turned out amazing. If you need instructions on how to glaze it is SUPER easy. You use a clean, lint free cloth and wipe on the glaze and wipe it off. That’s it. It isn’t hard. I have a glazing 101 post that shows instructions, but you need to use OIL based glaze for this project, not water based glaze. To glaze cabinets with oil based glaze you need to use a DRY cloth not a wet one.
  Step eighteen. Spray on your LAST coat of clear coat {you will need to do two coats total}. Don’t forget to sand, wipe off, and blow off with the air compressor in between each coat. You will get really good at it, I promise. After your last coat of clear coat you do not need to sand! YAHOOOO.
 After you have done two coats of clear coat, you. are. done! And you want to cry because you are soooo happy. 🙂
Step nineteen: Now all you have to do is reassemble, and since you numbered them perfectly and covered it with painter’s tape, all you need to do it take off the tape to reveal the numbers.


 They look like they were painted in a cabinet shop. I feel like a proud mother showing off her child.


I am in love.
EXCELLENT….I LOVE IT.
Would like an answer from the person that Shawn tough that wrote this. Sorry I didn’t see your name.
If I use White tinted lacquer and then the clear top coat will the cabinets turn yellow after awhile?
Can I do this outside or is it to windy and dusty?
Should I practice with a sprayer first due to never used a sprayer?
If using tinted lacquer on a already painted surface would I do anything different?
Thanks
I painted bedroom furniture white and used 2 coats of white Valspar latex paint from Lowe’s. I had no idea what I was doing so I took a drawer with me so the sales person would be able to see the project and advise me. It wasn’t necessary to use oil based since it wasn’t a kitchen or bath cabinets. It came out so nice. It was beautiful and I was so proud of my work :). I went back to Lowe’s for advice on sealing. The same sales person was there and advised me to use polyurethane and she brought the can to the counter for me and I went home and Painted it on. Again I was pleased. It turned out so pretty. I now have 3 coats total on the furniture. The next morning all the white furniture was a really gross yellow. I go back to Lowe’s (again with a drawer) to find out what I did wrong. I was upset because I worked so hard and spent money and there would be no more room for another coat if the drawers were ever to be opened and closed again. A different sales person was there on this final trip. I was told that I used oil based polyurethane and I was supposed to use water based over anything painted white. She said this was a hard fast rule. Managers were involved at this point and it wasn’t pretty lol. They gave me back my money back that I had spent so far and paid for more paint and the correct polyurethane and I went back home to fix it. Many frustrating hours later it looks great again but it’s not functional as the drawers are impossible. It’s a guest room so it isn’t used daily or I probably would have thrown it out lol. So I too am confused when she says use oil based over the white. There is no way it won’t yellow, in my experience.
yes, an oil-based polyurethane will have an ambering effect. However, in this post she describes using a lacquer which is different than polyurethane and will not have the ambering effect. It’s also more tolerant to heat.
Very good comment. Thank you. I was always told not to mix the oil and water… duuh, remember the salad dressing story. Lacquer sounds better than polyurethane. How about if I use store bought unfinished cabinets for my laundry and mud room? Do I need to apply anything to them before I start painting them? Or just a good cleaning…
As Tony stated the poster was using lacquer. A precast lacquer is a whole different product. It has several advantages and is really what the pros will use. You wont get it at the home depot or lowes. I use the Sherman William’s brand.
I use a sanding sealer to build the base. It sands So So So much easier than lacquer top coat. It is lacquer as well though. You could get away without it but sanding lacquer does gum up the sand paper a a lot faster. I skip it on small projects for speed though but it makes production so much faster and it buils pretty fast compaired to the top coat. After 2 to 3 coats of sanding sealer with sanding inbetween with 220 it’s time for top coat.
The laquer top coat in the sheen of choice is then sprayed. These are all pre-catalyzed lacquers. They add in some acid at the store. The mix is good for about 6 months (although I use stuff much older for non production stuff that people are not paying for and it works great. Be warned the stuff is not cheap. But the extra is so so so worth the results.
Why lacquer? Other than most durable. It dries FAST when I spray it. I can be sanding in 30 minutes between coats as its precatalyzed. . Lacquer is also doesnt layer. When you spray it actually forms into the previous layer. This makes repairs such as paint runs very easy to fix. Infact I have resurfaced project my lightly sanding then respraying years later and the result are awesome.
As for yellowing? Almost anything will yellow overtime. Lacquer will as well. But you would be hard pressed to see it happening or notice it. It is more stable than most other options like the polyies latexes from the home stores.
In the end lacquer is more prep and equipment heavy (sprayers, volatile compound. Need a real mask and venting) However the results are superior in every way. I dont know any cabinet shop that does not use lacquer. I use it over stains and dyed as well with incredible results.
When spraying cabinet doors,always lay them on a flat surface so that no overspray gets on the other side.Leave enough door overhanging so that you can pick it up and place on a drying rack away from overspray
What a transformation! Night & Day!I would have wanted the island painted too, but I'm a matchy-matchy type of person 🙂
Thanks for posting this with all the pictures and detail, I'm going to have to pin this for future reference!
Gorgeous and you guys are perfectionists! I think this post may have actually talked me OUT of painting my cabinets… sigh. What a job!
Ditto. I was just going to sand a little, throw on some semigloss I used to paint a cupboard and then polycrylic over. Sooooo… Not as easy as I thought.
Wow, that's a lot of work! Good for you for sticking with it. Such a beautiful, professional result!
Wowza girl! You rock my world so hard!
~Beth @ Sawdust
Good job!
It looks amazing and it makes me never want to paint my kitchen cabinets EVER! lol. My attention span and patience are not suited for that endeavor. It definitely looks wonderful! Our old apartment had painted cabinets, but the people used a roller brush and regular latex paint. I cannot tell you how many times our pots and pans stuck to the paint because of humidity.
WOW what a project! I feel like a slacker that you did your WHOLE kitchen and I can't seem to get a lil dresser done. LOL! AMAZED!
Rachel
http://www.hardinghappenings.com
I found you via Vintage Revivals. Love your work! I totally just pinned like your whole blog LOL! I'm a fellow DIY blogger @ http://www.cherryblossomsandchickens.com.blogspot
The kitchen looks great. However, it should be mentioned that you need to use a mask-style respirator that's rated for paint and organic vapors if you are spraying lacquer (the one in your picture looks correct).
Additionally, lacquer fumes are explosively combustible if not vented correctly (i.e., you could blow up yourself and your garage if you don't know what you are doing).
As a fire investigator and someone that runs a small shop on the side and sprays lacquer all the time. Blowup would be extreme. The air to fuel mix on area would be extraordinarily high to have that happen. Not likely under most senarios. Alittle venting and problems solved. There would be issues with rags and such when tossing them as the material is flammable. That’s more likely. But the biggest issue would not using a real facemask and inhaling the off gasses.
wow! awesome job! we are going to paint our cabinets very soon. Thanks so much (I think!) for the tutorial… just thinking about it is exciting and tiring all at the same time! ha!
wow what a great job your right they look absolutely professional
Those really turned out great! I want to do that so bad but I just don't have the nerve!!!
looks great. the only thing that got me is the wiping with a dry cloth and blowing with compressed air. why not use a tack cloth? its like cheese cloth with wax on it. picks up all the dust and doesn't leave residue (as long as you wipe and not SCRUB). Its what I use when painting.
Thank you for sharing every detail! It is GREAT information! 🙂
Your cabinets look so good, I had to share your post on FB and Twitter!
WOW!!!! You Did an amazing JOB. I Love It. Your hard work really paid off. Now if I can only get my husband to do this. I can't even get him to take my front door down for me. LOL…..
That was amazing! I have repainted my kitchen cabinets before…yours look better 🙂
What an awesome transformation!! You did an awesome job! I painted my cabinets with a paint brush and roller. Mine don't look know where's near as nice as yours. Thanks for the tutorial.
sandraallen260@centurytel.net
Wow, those turned out beautiful! Great job…..one I would never tackle! Maybe I shouldn't say never:/
I saw this on pinterest. Amazing! thanks so much for sharing all this great info!
This post is A-MAZ-ING!!!! Thank you so much for taking the time and effort to share it eith the world!! I am helping a friend in the bear future paint her kitchen cabinets, and was wondering if this technique will work for laminate wood cabinets as well or do they have to be "real" wood? In your photos your cabinets appear to be real wood. Thank you so much again for this! You ROCK and the cabinets are perfection! 🙂
Great job, looks beautiful.
Wow, I'm speechless after going through your site, which I happened to stumble upon through Pinterest. My husband and I just bought our first (and hopefully last!) new house 6 months ago. Since I am a stay at home mom for our active 13 month old son, we are still WAYS away from making the house "ours". Not to mention I don't have the time to research a hundred different sites for the "right way" to re-stain, re-paint, etc all the projects we would like to undertake. Your site has been a 1 stop shop for me and the best part is that you break everything down into simple step WITH pictures!! Phew, now I don't feel the need to stress over the "Honey-Do" List and neither does my husband! Yay! Thank you for your creativity, your inspiration and motivation! 🙂 Thank you Thank you THANK YOU!!
Great post, we are in the midst of a complete kitchen gut, this really helped!
Thank you for this wonderful tutorial! We will study it thoroughly. 🙂
I have a question…were these cabinets already white on the inside? In the beginning pics they looked like the were and then you covered and taped them up. We're they previously like that or did you do the inside first and then the outside? Very curious because my cabinets as wood inside and out and I would want the insides to match the out.
Thanks for this great info. Really loved that you showed pics of the products used. Especially loved that ou showed your mistakes. Now I know that if I screw up, not to panic, it can be fixed!!!
The cabinets were white on the inside on SOME of the cabinets, but they were also wood on the outside cabinets. So, we painted the ones that were wood so that they would match. It would have been easier to just paint all of the insides, but we didn't want to waste white paint painting what was already white!
Hi! Cabinets look great! Wondering if you have a total cost figured out? I would love to know so I could compare it with paying a professional.
Thanks!
Oh my goodness! This is THE BEST tutorial I have EVER read! Seriously the results are amazing. My husband and I recently bought a house with real oak cabinets. We would like to have the same look. My only concern is that the wood grain is going to show through. Did the cabinets you painted have a wood grain before??? Would you sugguest using a grain filler, or will the paint fill the grain enough???
We are preparing for the closing and painting the cabinets is #1 on the to-do list. Any suggestions would be greatly appreciated! Bravo for the beautiful kitchen!!!
apfister711@Hotmail.com
You did a great job on both the cabinets and the post, but for the life of me, I can't understand why anyone would cover up such beautiful wood with white paint.
What a transformation! You really put a lot of effort into this and it turned out amazing!
Wow, what a lot of work, now I know why they charge so much money!!!
Great Job!
So amazing! I'm also wondering if this would work on laminate counters?
Have you considered making this into an e-book? I am definitely going to be printing it out and using it. Thanks so much for putting it all together!!!
The finished product looks very professionally done. I just tried two coats of primer after using the deglosser on my wooden cabinets. But I noticed that the wood grain still shows through the primer. I'm wondering if the lacquer you described would take care of that? Also, am wondering whether it's impossible to get a very smooth coat without using a compressor?
Any advice thoughts from Ms. ThrifyHome or others would be appreciated!
if paint is totally dry you can use a vacuum with brush attachment or the blower part and not touch the paint. I have also used a damp tack cloth but make sure it is clean at all times and make sure it is dry before painting again.
how long did you end up waiting between coats on the doors?
There is special paint you need to paint laminate countertops, but it can be done. Google…
yep! I want to paint my kitchen because the cabinets are FIFTY years old and wow do they need help. I'd LOVE to have a kitchen that looked as good as these people's before photo!
I cannot tell you how thrilled I am to have found this! I have the same exact cabinets as the before photos and I have been wanting to paint them white for a while now, but I've been hesitant because I didn't think I could do a good job filling the knots. I've probably googled "painting knotty alder cabinets" a hundred times and never found anyone who hadn't hired out for the job. My husband has been very skeptical about painting them at all, but I think this post may have won him over!! I can't wait for summer to get here so I can start! Thank you so much for all the details you shared, it looks incredible and I can't wait my twinner "before" cabinets to match the "after" photos!
Great detailed tutorial! Great job!
I painted my kitchen cabinets with a brush and did not use a top coat but I am putting on a final coat of paint and a wax they will be done but since I only have 2 big cabinets and 1 small cabinet I did not need a sprayer. hopefully they will look a lot better with the wax over them thank you for the know how
another great tutorial! I wanted to let you know that I featured this today in my "What I Bookmarked This Week" post – stop by and see.
Thanks for the step by step & pics my cabinets are in bad shape & overdue for a change. White would make my galley kitchen feel bigger.
Hi! I was wondering how long this whole process took? And how many were working on the project?
It is absolutely amazing and I cannot wait to get started in my new kitchen!
Thanks for sharing this informative post, my sister was looking for a tutorial like this to paint her kitchen cabinets, will surely share with her.
Hi! The kitchen looks amazing! I was just wondering how long you waited between coats of primer, paint, laquer, etc. and also how long the entire process took you?
Basically, I started at one end and worked my way down and by the time I got done with that specific step, it was dry. So, it does dry fairly fast. Because it is oil base, it is thin and dries quickly. If you are unsure, just give it a little touch and if it still feels tacky or sticky, you know it needs a little more drying time. I hope this helps somewhat.
Love this tutorial! Will this work on Laminated Cabinets?
Yes, you can paint laminated cabinets with lacquer. Good luck!
I cannot believe how amazing these cabinets look!I am considering doing this with our cabinets. Is this a two person job? How long did it take you from start to finish to complete the job? Thank you for posting how you did everything step by step. It is very helpful to know what the project entails.
It definitely helps to have more than one person {especially with the prepping part.} It took us about a week from start to finish.
Amazing job, but I’m like others do not have the patience to do this so precise. I think I’d take the money from staying in a hotel and pay someone to do it. 🙂
WHERE DID YOU BUY THE LACQUER?! I can’t find them anywhere from the big box stores to anywhere online
Also, how long did you wait before each coat, lacquer & clear coat?
I bought the lacquer at Jones Paint and Glass locally. I waited until it was dry to the touch between coats. Since the lacquer goes on really thin, it was dry within 10-15 minutes {but it will depend on your climate how fast it will dry for you.
Generally you are having to go to a contractor paint store. Sherman William’s for instance. There are states you cant buy the stuff. The product is more a pro/pro-sumer option. The reason it dried so fast for sanding is that they add an acid to the mix to start the chemical precesses at time of purchase. The mixes are only good for a few months once the catalyzation mix is started. They say 6 months but I still use stuff well beyond that. Storage temp likely matters. I also wet my mix cutting it lacquer retarded that actually slows the drying a bit. I find it helps let the paint float out but also know that can lead to runs if your painting verticle and spray to heavy. Dont be intimidated by all that. It’s not hard and easy to recover from. The result… there is no better option in my opinion and what every shop I know of uses. The cabinet options at lowes and HD are consumer driven products. They work ok. Some you can brush or role on with great results. But they will pail compaired to sprayed lacquer.
I love it. I’m going to try this.
Hello Brooke:
I want to include your white painted kitchen cabinets in an article I am creating for Houselogic.com. I sent you an email last week. Can you shoot me an email ?
Deirdre
Check your email. 🙂
Hi Brooke! Great tutorial on this!!! I am wanting to paint my cabinets as well and was quoted $1,850.00 to do it. Can you please tell me roughly how much it cost to DIY. Your kitchen looks beautiful!
It was right around $450 to buy all the supplies.
Hi Brooke….I can’t find a brand of lacquer in colors to paint furniture….any suggestions ?
Catherine, this is what I would do…call a cabinet painting company in your area and ask where they get their lacquer. Every area is going to have a different supply store, but cabinet companies would know where to buy it.
Hello Brooke!
I just emailed you about the article we are writing that will include your white kitchen cabinet project (which will link back to your site). I need to make sure I am captioning and linking the images correctly. Can you please respond to my email as soon as possible? Thanks so much! I hope you had a great weekend!!!
deirdre
Hi, I have bookmarked this post in your blog because we are about to paint our cabinets and we want to do that as correctly as possible. I have checked out your list of things to buy and I have some questions. I know that Valspar is a Lowe’s brand, but I can’t find the pre-catalyzed lacquer, clear Satin pre-catalyzed lacquer in their store or on-line. Where did you buy it? I’m going to call Sherwin Williams to see if they have anything, but I just wanted to make sure I was getting the right stuff.
Need this stuff soon. We have about a week or so and we should begin the painting. ugh.
Yvonne 🙂
http://www.valsparwood.com/distribFinder/findDistributor.jsp Check out this site to find a distributor. I hope this helps!
Hi Brooke,
I found the white lacquer on-line at only one store…in Texas (I’m in Michigan). I’m just reading your answer to my initial question right now (I thought I’d get a notification in my email if you had commented, but I was wrong).
I purchased 4 gallons because we are planning on doing a dark color (like espresso) on the bottom and an off white (probably like what you have) on the top and I wasn’t sure how much we’d end up using.
Now I hope that Lowe’s will tint. Otherwise, maybe I can go to the one store (that is near me) that shows up from the Valsparwood link you gave me and they can tint it.
We hope to start spraying this weekend (fingers crossed!).
Hello again,
Just talked to Sherwin Williams and they tell me that you don’t tint lacquer. First you stain and then you spray the “clear” lacquer.
Can you help me with how to explain this to the Sherwin Williams guy?
Hi again Yvonne,
Sherwin Williams will tell you to use completely different products. Although I’m sure there are great projects, they are not the same type of product that I used for this project. I haven’t used their products enough to give a recommendation, so I can only give you information about the products I know. Good luck and I hope you find the Valspar lacquer!
Oh believe me, this has been a task that I wasn’t really expecting to be such a task. I thought since it was Valspar, no problem, Lowe’s would have it. Boy, was I wrong.
Anyway, I’ll let you know how it turns out. If worse comes to worst, we will use a latex paint in our sprayer and spray it that way (and clear coat it).
We went through the exact same thing. They don’t tint lacquer at many sherwin williams locations because it is a volatile substance and is very regulated and kind of costly is what the sherwin williams guy told me…
We had to find a local store that tints lacquer. It was actually much cheaper than sherwin williams to buy the lacquer there, too. They can tint to any color under the sun, too. The place we used was called Spectrum in Fayetteville, AR, but I’m sure there are many different local stores that do it.
They were pros! So, definitely look for a local trades/paint store that has specialists on hand that know the ropes.
Good luck and have fun!!
Not many people take the time to add a coat of clear lacquer after they’ve finished painting the cabinets. You definitely did it like pros – well done!
I’d love to do this to our kitchen, can you give me the lacquer color and codes for the white that you used for your cabinets? Thank you….the look great!!
We had the lacquer tinted a Sherwin Williams color called “creamy” but the products themselves did not come from Sherwin Williams. Good luck! I hope this helps!
My cabinets are already painted and badly in need of repainting. How do I prep already painted cabinets? It can’t be the same as for bare wood. Any ideas or links to articles for re-painting kitchen cabinets?
TIA!!!
That’s a GREAT question! I’m surprised I’ve never been asked it! And the truth is I don’t know! Let me ask my cabinet guy and get back to ya!
If you’re going to use lacquer, you’ll probably need to strip down to bare wood. Lacquer will show every bump and imperfection of the paint job. We’re experimenting right now with striping our cabinets and it’s going well. There’s a product called CitriStrip which is low on VOC and works pretty well.
Can you use a difference color paint then white?
Yes, you can tint the lacquer whatever color you want. 🙂 The possibilities are endless!
I have tried hi and low to find an oil based glaze for the kitchen cabinets and cannot find one. Would you kindly recommend?
I would contact a local cabinet shop and see if you can buy a tiny bit from them. You will not even need a pint to do the entire job. I live in Utah, and they carry the oil based glaze at Jones Paint and Glass. I hope this helps!
This is interesting…the end project turned out wonderful. One question, though, was the sanding between each layer really necessary, especially considering you were using a sprayer? Did professional cabinet makers/furniture finishers give you that advice?? We’re considering lacquer, not only because of it’s durability, but also because each lacquer layer “melts” into another. After 20 minutes, in theory, the next step is to just lacquer again. Poly absolutely requires sanding between coats because it has nothing to “stick” to. In theory, all the sanding is doing after the first layer is creating dust and taking off what you just put on. 🙂 I can see it taking out the tiniest of bubbles and imperfections but we’re not that fussy. It’s good to know there’s tintable lacquer out there, though. It may just solve many of our problems.
Yes, the professionals advised us to sand between coats of lacquer. I wouldn’t omit the step personally. I just know how well ours turned out and I would hate for you to do all the work and not have it turn out as well.
Hi, Brooke.
Amazing job on the cabinets. I’ve read a million How-Tos and this is by far the best. I didn’t see anywhere how many gallons of each paint you used. My kitchen is similarly sized and since I’ll likely have to special order this paint, I don’t want to short-change myself. Thanks again!
Thanks Kim! We used three gallons of creamy white lacquer and two gallons of clear pre-catalyzed lacquer. Good luck! Take before and after photos for me! I want to see your transformation!
I had a similar question to a previous post that I did not see an answer to. Our cabinets are currently painted, and I easy also curious to know how one would prep before applying the laquear? Your cabinets look great and so professional!! My husband and I have talked about spraying ours but are unsure of what we need to do to get them ready for a spray coat. I have googled and like you said everyone has there own thoughts, idea, and opinions. However, seeing that you have a friend that does this professionally I thought he may know the best route to go when it comes to already painted cabinets. Thanks for all of the great information!!!
Let me ask my friend, in the mean time do you know if it is paint or if it is colored lacquer that is already on your cabinets? Latex paint? Let me know and I’ll find out the answer.
Hi Brooke,
I’m back! 😀
We are smack-dab in the middle of our project. Thank you for the link to Valsparwood.com. There is a distributor (sort of) nearby and the guy who works there has been SO HELPFUL! He even came by our house yesterday to check out our progress and give us some instruction.
We are using a Wagner Power Sprayer HVLP, but were finding that the finish was just not going on smooth. It was what the guy at the Valspar distributor called “orange peel”. We learned some lessons yesterday when he came by. We needed to add a retarder to thin the lacquer (because it was too thick for the Wagner PS), we needed to stand closer to the item we were spraying and not be afraid to make it really wet (but without drips or puddles), we needed to keep the turbine outside (where it could get fresh air and not overheat the product), we needed to make sure that we always had enough lacquer in the can of the sprayer otherwise it would spit the lacquer out and we needed to keep the windows open and the fans blowing as hard as possible.
We spent two days (we’ll spend a bit more because of a huge cabinet that has the orange peel finish), sanding to smooth (using 280 grit sandpaper) the backs of the cabinet doors (which had three coats of tinted lacquer) and all of the drawers (which had the tinted lacquer and clear coat already done).
After the guy came and helped us with our technique, the finish came our FABULOUS! So, now me and my husband are much more confident that we will do a fantastic job. I’ll let you know if I’m being too overly positive 😉
An FYI for your readers, if you are going to spray a darker color such as espresso (that is one color we are spraying – the lowers are espresso, the uppers will be cream), the white base lacquer will not work. You have to use the clear base lacquer for your darker colors. That would be the same stuff you would use for the clear coat, only the technician adds the tint to it. And then you clear coat over that just like what you’ve done with the creamy color.
Let me know how I can send you pics.
Thanks, I’ve shared your blog with everyone I know 🙂
HA! Your comment just made my day! Thank you for the extra info! I’m so excited to see your cabinets. Make sure you are taking lots of pictures because I want to see! xoxo, Brooke
My husband is ready to purchase a paint sprayer- I am making him hold off. Can I ask how much it cost to rent a paint sprayer, and how many days you had it for? Did you feel that the sprayer wasted a lot of paint?
It costs $50/day to rent a commercial sprayer which is a great price because they cost around $1200 to buy. We used the sprayer for probably 5 days, but we could have done it faster had we prepared a little better beforehand. No, the sprayer didn’t waste a lot of paint. In fact, I think it saved us paint. It goes on really thin and professional-looking. Good luck!
DID YOU DO ALL THESE STEPS TO THE INSIDE OF THE CABINETS AND THE INSIDE AND OUTSIDE SIDES OF THE DRAWERS AS WELL? Because i still see brown cabinet. Thank You so much for taking the time to answer my question.
We painted inside the cabinets if it was wood. The parts that were already white, we did not paint. No, we did not do inside the drawers.
Brooke I am about to take on this project and want to start in my bathroom first. I am local to St. George and was wondering where you rented your sprayer? Thank you for your help.
I rented it at Jones Paint and Glass. Good luck!!!
Awesome. Thanks so much Brooke!
Found you on Pinterest! Love this article. Any advice for me though in my situation? The previous owners brush-painted over the lacquered cream paint that was originally there. Do I need to sand off their, eh, crappy paint job first, then use the deglosser… or will deglossing be sufficient?
Thanks in advance, and for pointing me in the CORRECT direction!!
Wendy!
I’m so sorry! Are the brush strokes prominent? If they are I would probably do my best to strip off the paint. That is a huge undertaking though. Maybe send me pictures directly to my email address and I will do my best to steer you in the right direction. xoxo, Brooke {allthingsthrifty at gmail dot com}
Love your drive to get it right! I would as a professional warn you against using an Oil Based lacquer in your home.
Most Oil based lacquers are called NITRO-Cellulose based lacquer’s, (same thing dynamite and Nitro Glycerin are made from) these products are highly explosive, the fumes and/or over spray can ignite easily. I assume that is what you used based on the strong fume comment. Waterborne lacquer’s use ammonia, about as strong as Windex with Ammonia, fast drying and with a fan the smell lasts about 8 hours and after 2-3 it is minimal.
You can also roll the waterborne lacquer on the cabinet boxes and get great results to save any spraying in your home. The average kitchen boxes and gable sides can be completed in 3-4 hours. Make sure all grease is cleaned with TSP, ammonia will over time draw up any residual oil in woods and it will turn brown, (Ammonia likes to clean)
There are several manufacturers that offer Waterborne lacquer’s. They are actually better in my opinion as you can get a high urethane (moisture resistance)content. You can also clear coat cabinets using Waterborne floor finish, the floor finish comes with Aluminum oxide (chemical resistance)
Oils based lacquer has a very low moisture resistance compared to the Waterborne products.
DULUX stores carry the X-Pert Brand. M.L. Campbell & Sherwin Williams also carry a water borne product now as well. M.L. Campbell is a Sherwin Williams owned Company so they have two brands.
Nice looking Kitchen! Well done. Love your site, very informative and real world results for the DIY!
Brooke,
I will send you some pics…our project has taken over 4 months. The prep and spraying portion has been going on for a couple of months now. We had 12 cabinet doors to paint espresso and 27 cabinet doors and an island to paint cream + the actual cabinets. Needless to say, we are not done spraying yet. We still have the fronts of 15 cream doors to spray and 2 espresso to RE-spray 😀 We’ve done plenty of respraying. We’ve gone through 15 gallons total of espresso/cream/clear coat (so, on average 5 gallons each).
But, we are finally coming to an end. We finally have a whole kitchen we can use again. That’s exciting after not having a sink for 4 months.
You can visit my blog and check out my pics. I’ve been keeping it up-to-date with the project details.
Thanks,
Yvonne
There is a reason oak, ash, maple, walnut etc are expensive as heck. Its because you never ever cover custom cabinets made of rare expensive wood with white paint. Next time call a wood worker up, he will come in take your cabinets down and put up white garbage cheap looking junk, because, in the end, all you have really done is wasted and wrecked some very fine looking grained cabinets with white paint. The laquer was a waste of laquer on paint btw.
To anyone wanting that modern white cabinet look. Take your old stuff down and sell it. Then proceed to purchase cheap mdf white looking cabs. You will have made money by the end and not wasted energy stripping your old rare wood cabs. Sigh.
This painting project is like what the pros would do. You are not “stripping” the cabinets at all, just prepping them by cleaning them and scuffing them up. The paint is a lacquer and it’s a nice hard finish that will not ruin the cabinets. The wood grain shows through so you end up with very nice custom cabinets with a professional finish.
Personally I did this so that I could keep my very nice oak cabinets that were looking very out of date. I didn’t want to get rid of them for the less quality cabinets that they make these days, so your option of taking down the old stuff and putting up the cheap stuff just defeats the purpose of wanting to keep the quality look of the cabinets. And I was also happy in the knowledge that I reused/recycled what I could.
You did a great job and it IS a lot of work. But, what professionals would charge for this is just much too high. People are happy with the outcome and so overlook the super-high cost of a professional. You showed that a DIY’er can do just as good a job for a whole lot less money.
Incredible. It looks completely gorgeous and professional.
How many gallons of tinted lacquer and clear lacquer did this project require?
We used three gallons of white tinted lacquer and three gallons of clear lacquer. Good luck on your project!
Bravo et merci à vous pour tous ces détails, ils vont nous servir 🙂
It’s amazing, thanks for all details, I will use your advices
Great instructions!! Taken a break over the holidays, this is next up on the remodel list. Outside of not having a kitchen for at least a week, and the hours of prep work, and the sanding, sanding, sanding, kinda ready to get rid of my 1980’s cabinets. I’m making new doors myself, as every 3rd door is a different size. They where custom made and built in place, the boxes are in perfect condition but the doors are hideous, I have tried every way plausible to salvage them, I got nothing. Yes they are that bad, and through out the entire house, something like 70 doors, geez… Thanks for the tut
I loved your tutorial….so detailed! I am wanting to paint my cabinets but I am so intimidated! I’ve been reading about paints that don’t require sanding prior to painting. Do you recommend this type of paint or the sprayer you used in this tutorial?
I would only recommend what my professional cabinet maker friend would recommend, and that is the products in this tutorial! Good luck!
Love you’re makeover. My dilemma, is that I want to makeover cabinets that were poorly painted with oil paint. Must I sand to the bare wood. Thanks for any advice.
No you don’t need to go all the way down to the bare wood, but if there are bad brush marks, then you will need to sand enough to remove those or the texture will be there when you paint over them. Have you thought about just getting new cabinet doors? That would eliminate most of the bad texture to your eye. Good luck!
Hi, great job on the cabinets. I’m always trying to figure out the best way to paint furniture that we have built. Currently my go to method has been a coat or two of zinsser cover stain and then Benjamin Moore waterborne satin impervo for paint and maybe some polyurethane depending on the piece. It works well enough but the cure time for water based is definitely a drawback.
Is it possible for you to post links to the exact products that you used. There are a few products on their website that show the same canister. Does lacquer require a primer? Did you use a primer? Is the precat lacquer considered a primer and then the other picture for a premium color system considered the paint?
I already have some plywood primed with cover stain which is oil based. Do you know if you can go over that with a lacquer?
Thanks so much for sharing.
This is an excellent tutorial. The pros charge a lot because it’s an intense process. My Dad, a pro cabinet builder, will not do refinish jobs for multiple reasons but a big one is that it’s too much work for too little profit (if you’re doing the job right- which they are in this tutorial). Most cabinet shops consider refinishing existing cabinets a “junk job” and thus if they are going to do it, you will pay through the nose for it.
I cringe when I see people use chalk paint (a product I like but does not withstand the kind of heavy use a kitchen gets) or regular latex paint- also a choice a person would soon regret. I love that you took the time to show that doing a job well is, largely, a function of prep!
We are in the middle of a DIY kitchen remodel. We have taken out walls, ceilings, rerouted electrical and built a pantry from scratch. We got some very good quality cabinets from a takeout and of all the things we have tackled painting the cabinets have given me the most anxiety. I have seen way too many painted cabinets that are clearly diy and I did NOT want this for our new kitchen. So after much research I found your blog and we have followed this tutorial to a “T”. I LOVE the way my cabinets are turning out! They are even better than I expected. We have a couple more coats to do on the doors and then we will be done. It has been quite the process, but so worth it. Thank you!
Brooke, what a wonderful tutorial and website!! I am so proud of what you accomplished and that you sought out the correct method with the right products and did the process correctly, they look like they were done in a cabinet shop but at a fraction of the cost. I read thru all of the comments and again I am so proud of you for giving folks correct answers to their questions, that has become so rare anymore and I hope you will continue.
I would like to share a bit of info with you tho that may help you and your readers on a few things. I was a professional painter and the only paint I will use on cabinets or furniture is lacquer. This has become hard to get over the last 6-8 years because of environmental regulations but the trick here is to look for an Auto Body Paint supply store. Lacquer paint is what was used to paint every car up till sometime in the early 70’s when they started to change over ti acrylic enamels. If you can not find a store close by then call a local auto body shop and ask where they get their paint from. They will be Able to tint to any color you can dream up and can also get all your other supplies there as well. Everybody out there will have a supplier within a reasonable driving distance to them So we can All try and support our local businesses as much as possible. They will also have experienced pros there that can answer any application questions folks may have so they will be able to accomplish the same thing you have.
The other thing I would like to say to your readers is that yes, it is a process with lots of steps, and the steps you have in your tutorial are required and needed to get it to turn out like yours, but it is NOT HARD, only lengthy! The nice thing about lacquer over other paints is that it goes on super smooth, has a very short dry time which means you have less chance for dust, bugs, etc to get into it which then means more sanding and repainting, and if you do get a run or other blemishes in it then you can sand it and re spray and be done the same day rather than waiting days and days for oil based and latex to dry and cure hard enough just to be able to sand it.
Please keep up the awesome work Brooke and feel free to email me if you have any questions your not sure of. I look forward to keeping in to dare with your site, your an awesome young lady Brooke!!!!!!!
Hey I’m a painter and I’m pretty impressed thats about spot on how I would paint this, but please include in the instructions!
TURN OFF ALL PILOT LIGHTS ALL FLAMES (WATER HEATERS, STOVES ETC. AND OPEN WINDOWS AND A FAN FOR VENTILATION,
EVEN TAKE YOUR PHONE OUT OF THE ROOM.) I met a guy the other day with a burned body because the fridge sparked a flame.
Hello There. I found your blog using msn. This is an extremely well
written article. I will make sure to bookmark it and come back
to read more of your useful info. Thanks for the post. I’ll certainly comeback.
This is a brilliant guide on painting kitchen cabinets. You have gone into a lot of detail, the pictures are a really great way to explain what you are talking about.
Thank you for this information. We bought a 50-yr old home a few months ago and ripped out the old cabinets before we moved in. We are still wtihout a kitchen… But, our new cabinets and doors will be here (yes, we’re using IKEA) this week. We don’t like the colors at IKEA (because there really are none if you wanted painted doors). So we will be painting the doors (not the cabinets). I love your details! I don’t think we’ll use the exact same products, but we’ll probably use your method. I’ve been reading for a couple of months now and have heard wonders about Zinsser BIN primer and Benjamin Moore paint. But now you’ve piqued my curiosity about lacquer! I’ll look into it.
I’ll keep you posted!
We used your exact methods for painting our cabinets last week and this week they seem to scuff way too easily. My husband is devastated because of all the work he’s already done to paint them. Any ideas why? We followed your blog exactly. Help!
Jennifer, how many coats of clear coat did you do? Email me at allthingsthrifty at gmail dot com, and let’s get to the bottom of this!!
Jennifer read my response. If u sanded after applying the deglosser thats your issue.
If I’m buying new cabinet doors and drawers that are unfinished, what steps can I skip for those? Thanks.
You can start painting the white lacquer without deglossing and sanding. But after you paint the white, you will still need to sand in-between coats.
Would you happen to remember the cost of the lacquers and also how many gallons you used:) thanks!!
Each gallon was around $40 and for this entire project we used about 7 gallons {four gallons of the white and 3 gallons of the clear coat}. I hope this helps!
They looks awesome!! But just to save everyone some time…. After you pply the deglosser you do NOT have to sand. You are actually defeating the purpose of using a deglosser in the first place because sanding afterwards will remove some of it ad if you dont sand enough(And using 220 grit wont do much but remove the deglosser) you will simply sand just back down to the old finish…risking your paint not adhering as well. Thats why its called “Liquid sander” Its not meant to remove grime and such. It is to degloss the surface and give it a rough texture so paint will adhere. Klean-Strip is the best one I have ever used. And when applied with a paint brush in a thick coat and allowed to dry for about an hour I have never had an issue with paint not adhering at all. I refinish things all the time as a side business and havent sanded anything I plan on painting in ages. Hope this helps!
very nice blog,
Question-if you are not glazing the cabinets, do you have to put the final coats of the clear coats on? Thanks and gret job! I love your redo!
Yes, the clear coat is definitely mandatory. 🙂 Good luck with your project!
Brooke,
Thank you so much for your tutorial, love love love. We are about to paint our cabinets this week and I’m a little unclear on one thing. You took the already white tint lacquer and then had Sherwin-Williams tint it to Creamy? If you could clarify this, it would so helpful!
Thanks,
Ashley
No, your local paint store should be able to tint the lacquer for you, and they can color match to the Sherwin-Williams color called “creamy.” You don’t need to physically go to Sherwin Williams. Make sense?
Thanks for all the details! I am wondering if this can be done on laminate?
Yep! It works on both laminate and wood!
Brook,
Could you please give me the complete name of the Valspar lacquers you used for this project.
Thanks.
I love the new color combo. Stunning..I’m going to do my cabinets with the kit from Rustoleum. Wish me luck 🙂
awesome work, looks beautiful
Thank you so much for this tutorial. I love your blog!!! Can you tell me how long you have to wait to start using your kitchen again? Once they feel dry can you start using the cabinets? I have painted a desk before and found that it took several days for the paint to really dry but that wasn’t laquour paint.
I’d say overnight is plenty of time. It feels dry, but I would give it a night to cure before using them.
Hi. We actually started using this exact process for a remodel. We started in the basement to practice. It has turned out beautiful. I have one question. The smell is awful. I am so sensitive to smells. I am worried to dive into the kitchen. Can you tell me how long the smell lasted after you finished? Days? Weeks? Months? Your kitchen is beautiful.
Only days. As soon as it dries the smell goes with it.
Hi there! I tried to sift through the comments, but I’m wondering how long this took you?
I realize with 20 minute drying times per coat per side that’s a minimum of 3-4 hours, but I’m looking for a closer idea.. is this something that you did in one day or was it split up over 2-3 days? Does the clear lacquer take longer to dry?
Thanks for your help!
(This post is amazing and is my holy grail for the next few weeks while I plan out our kitchen reno!)
Incredible results! You are so talented! I am not sure that I will be able to do this alone but you inspired me! I want to renovate my kitchen cabinets and I think that this Spring this will be my new task! Thank you for the detailed helpful article!
Exactly what I was needing for my laminate cabinets at home!!!!! Thanks!
How long did this project take? I’m trying to estimate how long it would take for my kitchen.
It took about week for us. But it all depends how fast you work and how many people you have. We had four people helping on a lot of it. Getting the kitchen prepped is the hardest part.
Thank you so, so much for this detailed, informative article. I was just starting to tackle this in the baths with kitchen to follow. Still not comfortable with the “piece meal” info I put together to do this, I was looking for something more describing entire process. Now I FINALLY feel I have excellent instructions, beginning to end !
Can you refinish with a paint brush and not leave brush marks? Are there any “leveling” paints that will not show brush marks if you finish with a brush?
I intend to paint the interior of the cabinets also. And I also want to paint the kitchen walls. What should one paint first? The walls or the cabinets?
They look amazing. How many coats of tinted lacquer did you use in the end ?
Thanks for stopping by David. We used three coats on most of the project. There were certain parts that looked good with two coats, so we didn’t do a third coat on those. For example on the drawer fronts, some of those didn’t need a third coat. Good luck if you tackle a project of your own.
Hi I am painter and your cabinets look good nice job. But that was a lot of steps. Ben Moore makes a great product that gives a factory finish and saves some time and money. I just don’t want people be scared to paint their cabinets when it much easier and less intrusive than that.
So our current cabinets have a dark glaze on them that is thick in some spots. Would I still only use the sander deglosser to remove the glaze or do I need to do something else first?
That looks fantastic! Now… please do my cabinets! 🙂
This looks terrific!! Definitely well worth the effort!
My cabinets are oak. Will the paint fill the grain?
No the paint is very thin and will not fill the grain.
Assuming what you were describing is spraying a solvent (lacquer) based pre-catalyzed lacquer, I cannot recommend strongly enough that you never spray solvent-based lacquers in a home environment. That finish is meant to be sprayed in an explosion proof spray booth. It is not a consumer product, which explains your difficultly finding it. It is a miracle you did not have an explosion and burn both yourself and your house down. They’re are waterborne finishes on the market that would be safe and appropriate for spraying in a home environment. The thought of other people following this advice is scary.
The cabinets look beautiful! I just picked up the same paint that you used today to do my cabinets. How are they holding up? Do you remember how long you waited to flip the cabinets over to paint the other side?
They are holding up beautifully! We waited only bout 20 minutes, but it was summer and it was hot outside and we live in a dry climate, so make sure they are dry to the touch before flipping them.
Thank you so much for the reply! My phone said it didn’t go through so I didn’t even think to look for it. There are so many painting cabinets tutorials out there but yours definitely seems to be the most professional and detailed. I am so excited to do mine now!
You did such a great job! They are beautiful! I just got the lacquer to do my cabinets and I had one question…How did you safely paint indoors? Do I need to take any special steps in ventilation etc? I understand not to have open flame- is there anything else I should do? Thank you so much! Your tutorial is so detailed! I think I am pretty much ready to start this daunting task hehe! 🙂
I would definitely open some windows if you possibly can. I know it’s winter time, so this may freeze you out. But, it is VERY fumey. Don’t forget to wear a full mask like the one in the tutorial the entire time to protect yourself.
Okay I was thinking of heating the house very warm then turning off the main circuit and water heater painting quickly then opening the window with a fan sucking out of the house as soon as the 20 min is up for drying then shutting the window and heating the house again a few hours later and doing another coat. Does that sound too excessive? I know that some warnings are on the very cautious side and I’m not sure how explosive it really is but I wasn’t sure since this is my first time working with lacquer.
I’m thinking of painting our kitchen cabinets gray and this tutorial was very helpful. Not looking forward to all the work that has to be done but I’m super excited to see the outcome. How long have your cabinets been painted now and do you have any chipping on in the paint? Would you do it again? Did you think about just replacing the cabinets versus painting them? About how much did it cost to paint the cabinets? We don’t have a garage to paint our cabinets in, can you recommend something else we could do (maybe use one of those pop up tents with all the zippered sides on it to make an enclosure?) Thanks in advance for your help.
I had mine done professionally and they do not look this good. i think they didn’t do a clear coat either. these look great!
Fabulous job! You should be very proud. Just installed beadboard and painted my sister’s 1930s kitchen. Hands are almost too sore to type this. I know and feel your pain! Awesome job! Thanks for the tutorial!
Nice post to share. This blog is worth reading. Painting the kitchen cabinets is not a difficult task. I had mine done from a professional company and they do looked just woww. I was very happy with their services.
What an awesome job! It looks like you had a professional do it! Just an opinion but I think if you painted the island it would look absolutely amazing, just like a better homes and garden kitchen!
Thank you for sharing your techniques and process it will make easy to paint kitchen cabinet.
Just what I needed to make a big decision on whether or not to pay to have my cabinets painted professionally or do them myself. I am opting to pay the $6,800 and let the pro’s handle it. More power to all of you who have the time talent and patience to do them yourselves.
My Kitchen is definitely the most used room in the house and the only place I would put a large chunk of money into. I can paint everywhere else myself no problem, but cabinets like that, no way!