I have been working on this tutorial for several days, and I am soooo excited to finally post it! I absolutely love our Greek key molding wall, and it was less than $30.00 in materials! I dig projects like this. I love when cost is low and impact is high. So, for those that have been waiting, here are the specifications of our Greek key wall.
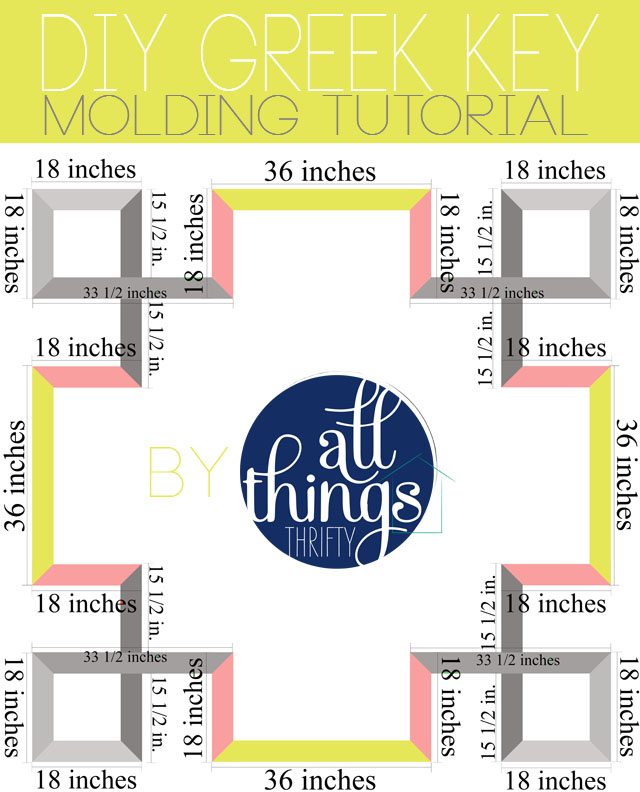
I designed this in Photoshop to be true to size. Our office wall is 105 inches square, so if your wall is not similar in size and square you will need to make adjustments to the lengths of your boards.
As you can see in the design plan below, I color coded each board so you can see the cuts you will need. But, we suggest that you don’t make all of your cuts at the same time. This is a project that you need to glue your level to your hip. A lot of times your ceilings are not level and neither is your floor, so trust your level.
Most of your joints will be a 45 degree cut, but if you notice in the picture below the red boards have a 45 degree cut on one side and a straight cut on the other to butt up against the green board.

One of my favorite things that I love about my husband is that I can come up with a fun design idea, and the next day he will show up with the materials to execute it. Yes, I am a lucky gal, I am aware.
For this project You will need:
A Miter saw
A Brad nailer and 1 1/4 inch nails
Levels
7 1X4 inch pre-primed MDF boards {they are actually 3 1/2 inches wide and 8 feet long}.
Nail Hole Filler
Paintable Caulk
White Paint or Paint of your preferred color {I painted all the boards beforehand and then just had to do touch ups on the nail holes and joints after installation}
When Dan started installing the molding, he started at the top and worked his way down. The cuts need to be extremely precise, and since he is an excellent finish carpenter, it took him less than 1 hour to complete.


")
")
")
This project is totally doable for those of you out there with some finish carpentry skills. I have to admit though, this is not a project for beginners.
Once your molding is installed on the wall, you need to caulk the edges and fill the nail holes with nail hole filler. I have a video at the bottom of THIS post showing how to do that quickly and easily.
This room is my favorite room in my house now!

I absolutely love it. I just need to paint the ceiling white, and find a new light fixture.

Don’t be afraid! It’s worth it!
xoxo,
Brooke
Brooke! I just can’t get over how INSANELY AWESOME this project is! And there are so many variations you could do! And you are my hero for making all those measurement graphics… yikes! 🙂
This is SO FABULOUS! Thanks for the tutorial and good job!
I have kind of an unrelated question…When you’re looking for art on Etsy how do you go about searching through it all?
Thanks!
This specific time I searched etsy for “geometric wall art.” I’m all over the place really. Recently it’s been fun to search floral wall art!
Thanks for the post, it looks awesome! I might even try it!! First I have to find a wall though!
I am so in love with project that I’m walking my house in my mind trying to figure out a wall I can put this on!! GREAT!!!
Yay!! I’ve been waiting for your tutorial. I just love this wall so much. Thanks!!
Oh that came out great!
This is stunning. And you cannot beat that price, DIY is always the way to go. I love this idea you have, definitely creative and unique!
Love those pillows!! Where did you find them?
The grey pillows are from Target, and the other three are from HomeGoods. I share the complete list of products I used in the room in this post: https://allthingsthrifty.com/2014/04/dysfunctional-office-into-safe-haven-sitting-room-makeovers-by-brooke.html
I love everything! Can you share where you found the bird prints?
Hi Christina! Thank you! Yes, the bird prints are from the Inknest on Etsy. I share the complete list of products I used in the room in this post: https://allthingsthrifty.com/2014/04/dysfunctional-office-into-safe-haven-sitting-room-makeovers-by-brooke.html
Hi Brooke. I love this sooo much! My kids and I love bird art as we have a bird as a pet. Would you mind sharing the source please? Thanks kindly.
Never mind. I saw where you mentioned it in a former post 🙂
Hi Delia,
You can find the prints at the inknest on Etsy. I have a link to them in this post: https://allthingsthrifty.com/2014/04/dysfunctional-office-into-safe-haven-sitting-room-makeovers-by-brooke.html
Ok, the wall is fantastic, but could you tell me where you got the prints and rug?
The Rug is from Rugs USA, and the prints are from the inknest on etsy. A complete list of products in this room can be found in this post: https://allthingsthrifty.com/2014/04/dysfunctional-office-into-safe-haven-sitting-room-makeovers-by-brooke.html
NOW THAT IS WHAT I CALL A TUTORIAL! Thanks so much for the cut list. I am so in love with this project and cannot believe the materials only cost $30. WOW! I am amazed {and jealous} that you husband works that quickly. I feel like this would be a 6 hour project at my house 🙂 Totally worth it, though!
Just wanted to say HUGE THANK YOU for this idea and for breaking it down to “step by step” instructions. I have been searching for something very creative for one wall in my room for a loooooong time and when I saw your post I can swear I heard angels singing “hallelujah”. Thank you again!!!!!
HAHA! Thanks for your comment. It made me laugh! xoxo. Good luck with your project!
Wow – stunning. Do you have any recommendations for a renter? Would love to do this at my apartment but seems like it would put too many large holes in the wall. We could potentially swap out the boards for something less heavy duty and more temporary..? Any suggestions? This is just beautiful & I adore your site! Thank you!
I would use boards are aren’t as thick. That way you won’t need as many nails to attach them! It’s a great way for renters actually because it’s 100% removable. But, yes, you are right, there will be holes to fill when they come down.
Beautiful! Still has a very classic and traditional look! Thanks for such precise instructions! I want this!
Has anyone tried this on a ceiling? I have been looking for an interesting ceiling finish, and I think this is it! I would paint the inside of the Greek key with a different color to give it some depth!
Hi. Love this as it gives a plain wall so much dimension. I’d like to try this but I’m wondering if this is a dust collector…..so many corners and flat surfaces that look like they would constantly need dusting. Thannks
I dusted every couple of months, but it wasn’t bad!
I have done a similar design on my ceiling and it looks great.l