Since we had a limited budget on our backyard project, my cute hubby, AKA Awesomeness,
 designed our inground trampoline plan. Dan had searched online for days. A good tutorial was no where to be found. In fact, we were both astounded to find that the CHEAPEST DIY kit is more than $600.00 (and this didn’t include the cost of digging the hole). Plus if you have a professional landscaper come and do the project, the cost was around $1500.00. Um…no way.
Dan conglomerated his own plan with tidbits gathered from several sources. A good friend Jeff Poulton let us come and check out his design. Dan made a few modifications of his own, and off we went to buy the supplies.
Supplies List:
Eight 2X4X12 of pressure treated wood
Four 4X12 sheets of roofing sheet metal
1 1/2 inch Self tapping screws
16 cinder blocks with u shape groove
Tools:
Shovel
Level
Tin Snips
Hammer
Drill
Tamper (to help compact your dirt)
First things first, Step 1: Dig your hole. We had our landscaper include digging the hole for our tramp in our landscaping. Our ground is FILLED with rocks. After attempting to dig holes in our backyard for trees, we knew that digging an entire trampoline hole was out of the question. This cost approximately $150.00 to have the landscaper dig the hole and haul away most the dirt.
Sidenote: You will need to save some of the dirt for later. So, don’t get rid of all of your dirt.
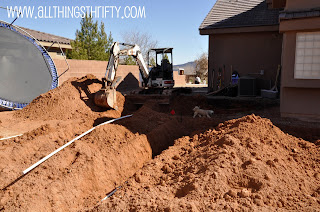
The hole needs to be one foot larger than your trampoline’s circumference. For example, if your trampoline is a 14 foot trampoline, you need a 15 foot hole. Kapeesh!?
Advice: Make sure the frame fits into your hole before continuing to the next step. We had to manually shovel the sides of our hole for several hours before ours would fit.

Next, level your trampoline. Your trampoline needs to be completely level in the ground. To accomplish this, we used cinder blocks with a U shaped groove in them for the trampoline legs to rest in.
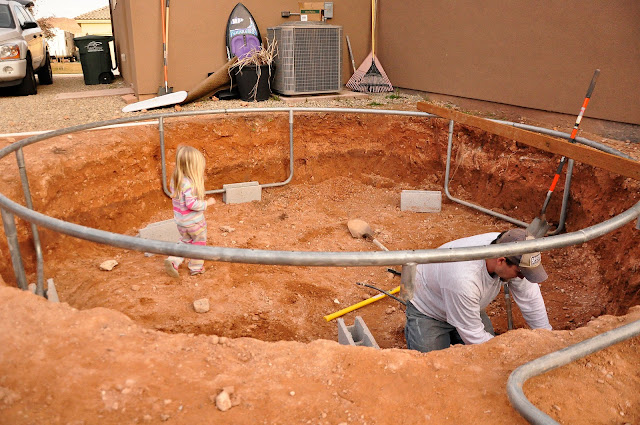
We used four cinder blocks per trampoline leg. Dan was careful to level each section of the tramp by placing a long 2X4 across the top of the tramp with a level on it. This allowed us to make sure that the tramp was completely level when we finished the process. Each cinderblock was dug down and secured into place with the surrounding dirt.
Tip: When putting a trampoline in the ground, you need to leave enough room for the air to escape. We wanted our tramp to be four inches off the ground to create a channel for the air to flow. Most of the tutorials we read said to leave at least 2 inches of leeway. We wanted our trampoline to have as much bounce as possible, so we left it 4 inches above ground level. If you do not do this, your trampoline will lose bounce because the air will have no where to escape.

Next, take the trampoline out of the hole. we took the trampoline frame out of the hole to begin construction on the surround structure.
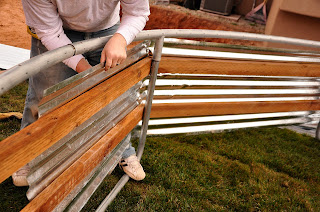
First, take pressure-treated 2X4s and cut them on 22.5 degree angles. Attach each 2X4 section to the leg of the trampoline section by using self tapping screws. Continue all the way around the trampoline.

Install a second layer of 2X4s it should be installed 12 to 16 inches beneath the top layer. The 2X4 frame is attached to the trampoline legs to help create a supportive barrier for the surrounding dirt in the ground.

Next, begin screwing your sheet metal to the 2X4 frame. Four 12 foot lengths of sheet metal was used to surround the 14 foot trampoline. Each sheet overlapped the next sheet by about two feet. This prevents the need to cut the sheet metal. Start on one side of the trampoline and bend the sheet metal to fit securely along your 2X4 frame.

The top of your sheets should be about 4 inches higher than the 2X4. This allows enough metal to fold over the top of your 2X4 and screw it securely into place on the inner side of your frame. This prevents any sharp edges from sticking up.
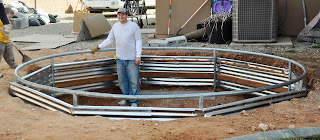
Here is a picture of how we did the corners of each leg. We used tin snips to cut a slit into the metal and folded each side down and screwed it into place.


Next, gather a few strong helpers to assist in placing your tramp back into its hole. Make sure that each leg is back into the cinder block groove perfectly. Double check that your trampoline frame is level.
The last step of installing your inground trampoline system is to back fill and compact your dirt on both the outside and inside of your trampoline frame. This will prevent your dirt from caving into your trampoline hole. The outside dirt should be level with the ground. The dirt on the inside of your tramp should slope toward the center of your trampoline. The dirt on the inside of the tramp needs to cover at least 1/3 of your sheet metal frame. The dirt on the inside and outside helps your tramp to stay in place while you jump.

Sidenote: If your trampoline is in the middle of your lawn area, you will need to take extra precautions to ensure proper drainage in the bottom of your hole. We did not have to worry about this step because our sprinkler system does not affect the area where our trampoline sits.
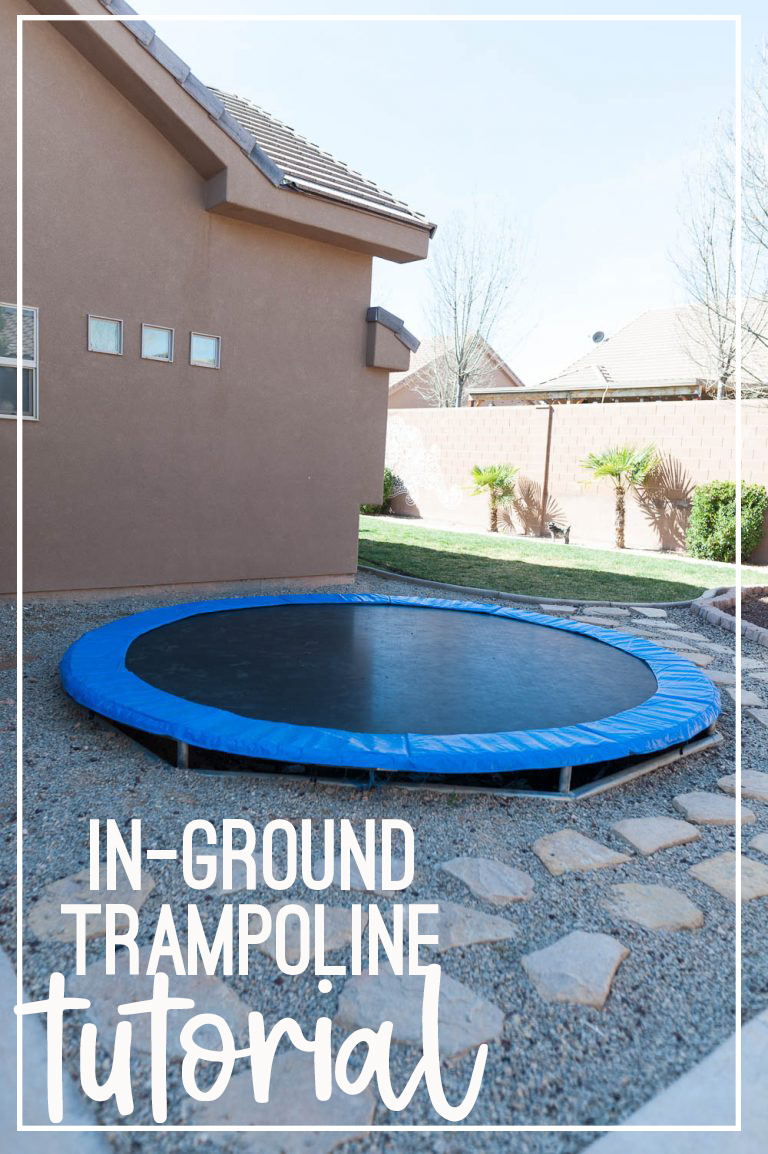
It is SOOO much fun! The kids love it…and so does my dog Sugar. 🙂

Total Cost:
$150.00 to have the landscaper dig the hole and haul the dirt plus $150.00 for the supplies =
$300!
If you missed our backyard reveal post, check it out HERE!
Update: 10/8/2012 I have had a lot of questions about water filling up in the hole for our trampoline. We haven’t had any problems with this personally, but we specifically put the tramp in a location in our backyard that does not get hit by any sprinklers. We also live in a dry climate that doesn’t rain a lot. But, we have had a few instances that my husband accidentally left our hose running for hours and hours filling up our pool next to it which overflowed the pool and filled up the trampoline hole. This has happened three times and the structure has stayed completely in tact. We did pump out the water with a water pump and hose within a few hours though. I hope this answers the questions out there about water and our in-ground trampoline!
Your husband is Awesome! That is a great idea and he did a awesome job. Post pics of the kids on the trampoline, please!
i like it! i've never seen this before – is it just for safety?
Yes. That way the kids don’t fall off and have such a far drop. 🙂
Nice idea! Just wondering what keeps critters from living under it?
We don’t have many critters around, but we definitely get it sprayed for bugs every couple of months.
I had no idea there was so much involved for an inground tramp! Makes total sense now, but I thought you just dug a hole! Silly me.
So how many toys are in the tramp's tummy by now?
A LOT! Ha! But, we take a few springs off every couple of months and clean it out. 🙂
How much space did you allow on the inside between the dirt and the trampoline when it is being jumped on? (so the people jumping don’t hit the dirt)
We floated the trampoline three inches higher than it would be if it was sitting on the ground so that the air can escape when the kids jump. So if the trampoline was 30 inches tall, we would put it in the ground 33 inches. Hope that helps!
I have younger ones, and a teenager who’s at about 100 lbs. They do like to jump up to 3 at a time (the little ones 8 and 9, and about 50lbs each). Do you have to worry about the kids hitting the ground underneath?
We have never had that problem, and my older ones are both over 100 lbs!
I’m wondering the same thing!! The dirt on the inside looks like you can only jump dead center because the dirt is higher everywhere but the center . I’m confused how you can’t feel it if you don’t land dead center ?!? I love this tutorial but I am definitely confused about this part…
The kids can jump on the entire trampoline without hitting the dirt.
My Husband and I are no where close to doing this project but I am so glad that you posted about it. I never would have thought about all that goes into it! It's so much more than digging a hole!
wow, that was a big job! I don't think I could own a trampoline though. My dad is a personal injury lawyer, and I have seen way too many broken legs and injuries! But my husband loves them..so we will see. Excited to see the back yard all finished!
Wow, great tutorial. I've seen trampolines in the ground before and you are the first to address it and post a tutorial. Thank you very much for sharing the knowledge with me. Jackie
thanks for posting this…. I had no idea…. I always thought you just dug a hole and plopped the trampoline right on in…. looks fantastic and super fun!!
That's awesome!
Thanks for this post! I'll have to show my husband. We've been seriously talking about getting a trampoline and would love to have the in-ground type!
Nice job, Dan!! (again)
This is a great idea!
http://gingersnapcookie.blogspot.com/2011/05/welcome-to-trampoline-101.html
We've had our trampoline like this for years and love it! We get leaves under there in the fall but they compost over time. You will enjoy it!
Great idea.
Oh my goodness – wonderful! Thanks so much, we'll definitely be doing this at our new house. Love the cost breakdown and photo instructions! found you on pinterest.
Great idea, it is amazing how many get injured falling off these things. When landing from the height these things are off the ground. My kids are almost grown up, so no need now. But I think it is just awesome. If I were to have that done I would probably put chicken wire on the 4 inch gap to keep toys from falling in or even legs, but mostly to keep critters out!!
We just did this, I wish i would have read this first!!!! We did it a harder way and put the dirt all the way to the top so no air comes out. OOOOPSS!
Wow! I want one!!!
This is a very thorough job! I have to say, with our soil (thankfully less stony than yours and with enough clay content) I was able to just dig a hole and sink it and I must admit, I didn't leave a gap at the top and the airflow has not been an issue.
You can see the results here!
http://littlegreenfingers.typepad.com/little_green_fingers/2009/02/how-to-create-a-sunken-trampoline.html
thank you so so so much for posting this. My husband just told me NO on an in the ground tramp because of the cost. I bet he'll change his mind now. 🙂
That is the most ridiculously ingenious thing I've ever in my whole life seen. Thank you for sharing. I have added this link to my bookmarks so I can talk my (completely NOT handy) husband into doing this for our almost 10 year old.
What a great tutorial. Thanks for all the hard work! Are your kids just the happiest kids on the street?
This is a great tutorial!
We just picked up a nice trampoline at a garage sale yesterday. My kids are still little and having them that high up and jumping around makes me a little nervous. I wanted to put it in the ground, so naturally I did a little poking around and also found that $600 kit. Sorry, but no. This looks awesome, and will also help with durability I would think.
Thanks for taking the time to share!
I broke my right arm falling off a tramp – unfortunately the way I fell with my arm extended backwards and my wrist bent, being low to the ground wouldn't have prevented it – plus, my brother through me into the air WAYYYYY over his head with his jump, so I was still pretty high up… and I was 16 and more of a daredevil than I am now! A few years later my brother tore his ACL jumping, not falling, so there won't be any trampolines for my kids. But I like how this is less conspicuous. Down in the ground and out of site! Great job.
kids can get hurt hiking riding a bike swimming etc.. but teach your kids how to do them safely and let them enjoy life not restrict them from things that could hurt them. Kids fall off monkey bars and etc all the time. I Say let kids jump they love it just try to make safety rules!! I love my tramp in the ground it's awesome!!! thanks brooke
How do you keep wildlife from making that area under the trampoline their home?
We don’t have this issue because we have a fenced in yard with a block wall all the way around our lot.
Great job you have made in your garden. Congrats!. Berg Toys has a model "Berg Toys InGround" specially designed to put down in the ground. And for the lazy ones they can buy the safety net.
I wrote (in spanish) how to sink a trampoline in a diferent way.
http://topludi.wordpress.com/2010/11/24/como-enterrar-una-cama-elastica/
I was just about to give up on installing ours this way… Until I read this!!! You guys made it look so easy. 🙂
I saw one of these on The Novogratz's show and thought it was so nice because the main reason I wouldn't get a trampoline was because I was afraid of someone falling and breaking something, like my cousin's daughter did. I saw how much the in ground one's were and thought we are never going to have a trampoline, thanks to this tutorial I think we will!
Very nicely done!
Might I add that it may be beneficial to paint or do some other sort of rustproofing on the frame of the tramp before burying it. That frame looks like it's still doing a lot of work structurally, and adding a layer of protection besides the galvanization that's already on the frame and metal paneling would be beneficial because being in contact with soil dramatically accelerates corrosion.
It also could be better to use fiberglass instead of metal paneling… although that would most likely make it more difficult.
The 2x4s should also be rated for ground contact… or at least green treated. You did a FANTASTIC job… but I think that these little-bitty changes might add to the longevity of your project.
Hello, was just wondering, do you need a special trampoline or can you just have a normal one?
A normal tramp is all we have. No special tramp is required or needed.
I'm jealous–ours is above ground.
I love the way it looks. You husband did a wonderful job. I agree with the comment that kids need to learn safety rules. My oldest daughter fell off the monkey bars and broke her wrist, my middle daughter broke her arm at the elbow playing soccer. So far no injuries on the trampoline and we've had it for 3 years.
Linda
mysewwhatblog
that looks amazing! my hubby can barley build an ikea bookcase so doubt we'll attempt this but it looks great! 🙂
@Daisie Edgerley
It's just a normal plain old trampoline. Hope this helps! Good luck!
What about the hole filling up with water when it rains? My husband was worried about masquitoes?
I think this is an awesome way to put in a trampoline. Much safer than regular. I think there could possibly be water issue in South west Washington. We can get a lot of rain some winters. So I think it just means use common sense.
Thanks a ton for this post!!! I have been combing the internet for a long time in search of great instructions and am very excited to have stumbled across yours. You guys did a marvelous job! I will be making mine this summer and you and your awesome hubby will be a great resource 🙂
Thanks
Goran
What if you were to move. Would it be easy to pull out and take with? Just bought my son one and we currently rent but I would like to have it in ground for safety as well at if high winds were to come along I dont want it ruined. Juist a few weeks ago high winds came and destroyed out swing set.
It would be pretty tough to take it with you, but it definitely is possible. After you put it in the ground, you fill in the dirt around it, so you would have to dig it back out in order to take it with you.
This brings back so many wonderful memories! I grew up with an inground trampoline….back before trampolines were so popular. We were the only ones in our area that had a trampoline. My mother said I could jump before I could walk and that was 50 years ago. Our trampoline was rectangular and it did not have legs. It was just a heavy metal frame that rested on a wooden platform that was built around the hole in the ground. In the early years it had metal straps that anchored it to the boards, but eventually those straps broke and it just rested on the boards without any thing anchoring it down. It was alot heavier frame than what the round trampolines of today have and it did not move much. Since it was rectangular, each corner had an opened area where there wasn’t any springs attached. Animals would occasionally crawl under there, but they could easily get back out. It also made it easy to retrieve anything that got dropped under there or we could just pick it up and move it if needed…like to chop down the weeds once in awhile. There was a drain pipe installed in a low spot of the hole and we used an old “hand pump” in the yard to pump out the water. Eventually the drain pipe got plugged up with dirt and we occasionally had to put a pump in there to pump the water out, but it also was fun once in awhile to jump and splash water everywhere! Over the years we had to replace the trampoline mat and springs several times and even though I broke my leg and my brother broke an arm we had so much fun on our trampoline playing ball tag and other games that you can’t do with a net surrounding it above ground. We now have a round trampoline with a net enclosure for our kids….but it just isn’t the same 🙁 Even though mom and dad filled the trampoline hole up several years ago and just recently junked the old rusty frame…that spot in their yard just does not look the same without the trampoline 🙁 Maybe someday…..
What a great story about your trampoline growing up! Thank you for sharing! I have wonderful memories jumping on the trampoline with my brothers and sisters too! We used to jump up off of the house onto the trampoline! Shhhh don’t tell my mom, j/k she knew!
Brooke,
One thing you didn’t include in your post was how long the entire process took. Can you estimate digging time, and each subsequent step time? Thanks!
We had the hole dug by a backhoe so it took about an hour. Then installation time took about 8 hours with leveling time from start to finish.
So I did this for my kids! Thank you by-the-way for providing these instructions. I tried to follow yours to a T, but there are a few variables on how I had to change it up a little. This project did add up to be pretty expensive though. $250 for the hole, $250 trampoline, $150 for pretreated wood, $100 corrugated metal, $40 screws, $200 supplies (shovels, saw, etc). A $1,000 trampoline project and many man hours with the shovel.
I have to admit though, it’s worth all the smiles on my kids faces so overall, really happy about the project! Thanks for sharing.
Wow! Amazing! I’m totally impressed! Your husband did a great job and i bet everyone esle was happy to have that trampoline. That one looks sturdy and safe. I need to share this with my husband, hopefully he can do the same on our backyard. The kids have been wanting to have their own trampoline.
this sounds like a great project. for some reasons i cannot see any of the posted photos. is there any way you can repost them, or email them to me. thank you.
Scott, what browser are you on?
What about grass/weeds?? Have you ahd any problems with grass or weeds trying to grow under it?
We haven’t had any issues with this. But, we do live in a dry climate, so maybe that is why.
Just a technical note- the U shaped concrete blocks are called “Bond Beams” or “Knockout Blocks”. For those of you that are going to your local masonry supplier you know what your asking for. Great tutorial for a fun project!
love this been looking for a way to put some kind of barrier on to hold the dirt up around it. great idea.. guess what my hubby will be doing! thanks for sharing this with everyone.
Great tutorial. We live in Dammeron, and just finished burying our trampoline using your instructions. Thanks!
We are just getting around to building a frame for our in ground trampoline. We would like to know where you found the u-shaped cinderblocks. Did they come that way or did you notch them out?
They come that way. Ask at Home Depot!
With four boys and one girl, we are doing this for Christmas! I will be taking pictures. Thanks sooo much for posting this!
Brooke, just want to let you know we did do this. We didn’t have a backhoe but we just had a tank excavated from our property which essentially left a big whole – which gave us the idea. Eventually found our way to this page. The only thing was a few days after we finished it started listing to one side, so we had to take some remedial action. Overall a nice tutorial. Very clear images. Was a big help. Fred.
I LOVE this idea; trampolines can be so dangerous. However, did you ever have problems with snakes? I worry in the South that snakes would find it a great, safe, cool/warm location. Also, any problems with it becoming the neighborhood cat litterbox?
Our yard is completely fenced in with a block wall, and we have a silver lab in the backyard. So cats steer clear of our backyard! HA. As for snakes, we don’t have many snakes in Southern Utah in neighborhoods, so that’s definitely something to think about if you do. Good luck!
Great DIY instructions! Just wondering why the roofing sheet metal and wood frame is needed. Couldn’t one just set the trampoline down in the hole on the cinder blocks? Just curious. We are thinking of doing this very project and I’m so glad we found your post!
Yes it’s definitely needed. It keeps the dirt around the tramp from naturally eroding back into the hole. We have had several incidents with water around our tramp, and it has been perfect. We even accidentally flooded underneath the tramp, and it held up great.
For me it’s stupid and expiensive idea. Afer heavy rain water will be stand under trampoline – good place for exist to mosquitos.
What, when kids will grow up and don’t want to play on trampoline? You will have to call a digger once again to get it out and fill up ground.
You should tell my kids that when they are jumping on the trampoline every single day of their lives. Plus, if you are worried about standing water, install a sump-pump.
if it was $350 to get dirt removed and supplies how much was the trampoline? 🙂 we need almost your exact price so we know what we are paying. This is the best idea ever!
Good question! We actually got the trampoline from a friend for free who was getting rid of it. We are grateful for his kindness and generosity.
We just completed this project. Thank you so much more the pictures and instructions. It helped tremendously. Updated cost for anyone browsing around. All the supplies listed on this site plus enough corrugated pipe to go around hole and trench came in just shy of $300. The pipe was the most expensive part of this transaction. We paid a local excavator who was already in the neighborhood $200 to dig the hole and later rented a skid steer to move some dirt around and level some spots in backyard. This was an extra cost of $250. After adding the $250 for the trampoline total cost was right at $1,000. We live in Tennessee with snakes and mosquitoes so time will tell with those concerns, but I believe we should be fine. Like others have mentioned it was an expensive DIY but the smiles on the kids faces make it all worth it. Thanks for the help.
Brian
I live in Tennessee and I am putting a tramp in ground-hows it going w/snakes and other unpleasant critters?
Brian,
I live in Tennessee and putting a tramp in ground-how is it going w/snakes and other unpleasant critters?
how do you keep it from filling up with water?
Our trampoline is not close to any of our sprinkler lines and is free from water most of the time. In the case of a major rain storm or flooding from the hose…etc we use a sump-pump to pump the water out to the street.
What about drainage for the winter?
We live in a dry climate that rarely gets snow, so for us we don’t have to worry about that, but we have flooded it accidentally several times, and a sump-pump worked like a charm.
Hi
How do you stop the hole filling up with water when it rains – do I need to put in drainage?
Thx heaps
Gemma
We have never had enough rain to cause a problem, but we have flooded it a few times on accident by leaving the hose on nearby. It held up nicely, and all we had to do was pump the water out with a sump-pump.
Have you used a normal above ground trampoline for this? there are specific trampolines made for exactly this purpose on the market now.
Yes, a normal above the ground tramp is what we used. Interesting that there are specific trampolines for this! I had no idea! Great tip!
What about the tramp fabric and springs etc.???
🙂 Yes, you need a tramp first.
I see now. You are burying a tramp in the ground so STEP ONE – get a tramp.
Yep.
I don’t know where you found a landscaper to dig the hole for $150 dollars but I own my own landscape/excavation company and I wouldn’t even bring a dump truck and excavator out for that much or I would be loosing money
I’m sure the cost for digging a hole varies depending on the area. Keep in mind this post is also several years old. The cost could have increased significantly since we posted this.
Our local guy is $80/hour for the back hoe or skid steerer.
This is a totally awesome tutorial! I just went step by step and built my own in my backyard for my kids it worked out excellent thanks so much for this!
I live in Illinois countryside and I’m concerning about raining pour in trampoline flood it. How can I not have it happen?
You could definitely bury a sump pump at the bottom of the hole that would pump any water out if you wanted.
Now that it has been a while, have you noticed and rotting of wood or rusting of metal parts?
Nope! Everything still looks and works great! And the kids use it probably daily!
Wow thanks for the DIY instructions – I’ve always wanted my husband to do this in our backyard but ended up settling for a above-ground one.
I’ve bookmarked this page so that if i ever convince my husband to do this, he’ll have some instructions 😀
So glad I found your post, as I am going to install ours.
Hi Brooke, just wondering if the trampoline you purchased was a specific inground tramp? Thanks
Nope, it was just a regular trampoline. 🙂
Brian,
I live in Tennessee and putting a tramp in ground-how is it going w/snakes and other unpleasant critters?
Thank you so much for this tutorial, we followed this to a T and just finished ours yesterday. Did you end up landscaping around the trampoline?
We put rubber chips around it!
Wow, I love this, We dug a small drain using pvc pipe to solve the water issue
We just finished burying our trampoline using your instructions. THANK YOU!! It turned out wonderfully!
Haha, I was just reading this blog post and got to the part . . . ” But, we have had a few instances that my husband accidentally left our hose running for hours and hours filling up our pool next to it which … “. Oh crap ! I left my garden soaker hose on all day !!! Ooops (lays down computer and runs outside real quick!). So glad I was reading this blog, it might have been tomorrow or the next day before I remembered. LOLOLOL
I 2nd/3rd…wherever the compliments were of how nice a job. you did. I didn’t read all the posts but wondered if anyone has done what was in my head. I just assembled a new trampoline and was only planning to dig 3 trenches to bury the legs. First I plan to set up my iPad to video underneath while I am jumping as high as I can to see the full extension below to know how much clearance is needed. I would add a few inches and bury that far. I haven’t done this yet but suspect about 14 inches will be sufficient. This should be pretty simple and provide most of the benefit. Anyone else try this?
Hello. Did you have to get a permit to dig the hole?
Not that I know of. Our landscapers dug the hole for us, and as far as I know, no permits were needed.