One of my favorite things to do here at All Things Thrifty is to provide a step by step tutorial for those that would like to recreate a project themselves. I also like to take something that I have never done it before and “figure it out” so to speak. So, with the help of a friend, we now know the dos and don’ts of diamond tufting. I am not new to tufting, but I always wanted to find out how to make the deep tufts that I’ve seen in so many fun projects out there.
Ok, peeps, I’m going to be honest here. This project was a doozy. Make sure you have patient attitude before embarking on this project. (Or in my case, make sure you don’t have EIGHT kids running around while you are trying to figure it out…speaking from experience here! Ha ha.)
Items needed for this project:
A bench or a chest to upholster the top of
A long straight needle (I bought mine at JoAnn’s)
Heavy fish line (or tufting twine)
Cotton
Staple gun and Staples
A drill
Foam in the thickness of your preference.
Fabric of your choice
Upholstered buttons (We bought ours at JoAnn’s)
A piece of metal pipe
A pair of pliers
Good fabric scissors
Ruler
Pencil
A piece of ply wood cut to the correct dimensions
A piece of batting large enough to cover your foam
Step 1: Choose a piece of furniture that you would like to transform. You could use a cedar chest, a bench, a coffee table, a stool…etc. If you choose a piece of furniture with squared edges, it will be easier. If you use a piece of furniture that already has foam, it is possible to reuse the foam. It will depend if the foam is in good shape or not. If it is in pretty good shape, I suggest to reuse it.
Here is the bench that Andrea wanted to transform:
It is actually a cedar chest, and I liked the shape, the detailed pattern along the edge and the angled legs.
It needed a light sand, a coat of primer and several coats of paint, but then it was ready for the ultimate transformation.
Step 2: Measure the top of the furniture and have the peeps at Lowes (or any hardware store) cut a piece of ply wood to fit the top. This measurement needs to be precise. You don’t want it too big, and you don’t want it too little. It should fit “just right.” Remember that when you get done with the project, you want it to look like it was professionally made. If you don’t measure precisely you stand the risk of it looking “homemade,” and we don’t want that.
Step 3: Cut a piece of foam the same size of the ply wood. We got our foam at JoAnn’s. (Make sure you use a coupon. Foam is expensive!) We wanted our tufts to be really deep, so Andrea opted for 4 inch foam.
Step 4: Mark your foam in the pattern you want your diamond tufts. Use a ruler to mark straight lines and then alternate the rows to create the diamonds. You can do as many tufts as you would like. We did 14 tufts in our bench, five tufts along the top, five tufts along the bottom, and four tufts in the middle row.
Step 5. Drill holes your foam. Use a drill and drill bit. Make sure you push the button on the drill before you start drilling, get the drill bit going fast before you start drilling into the foam. If you don’t do this, the foam will get caught on the drill bit and rip a large hole in the foam (again, speaking from experience).
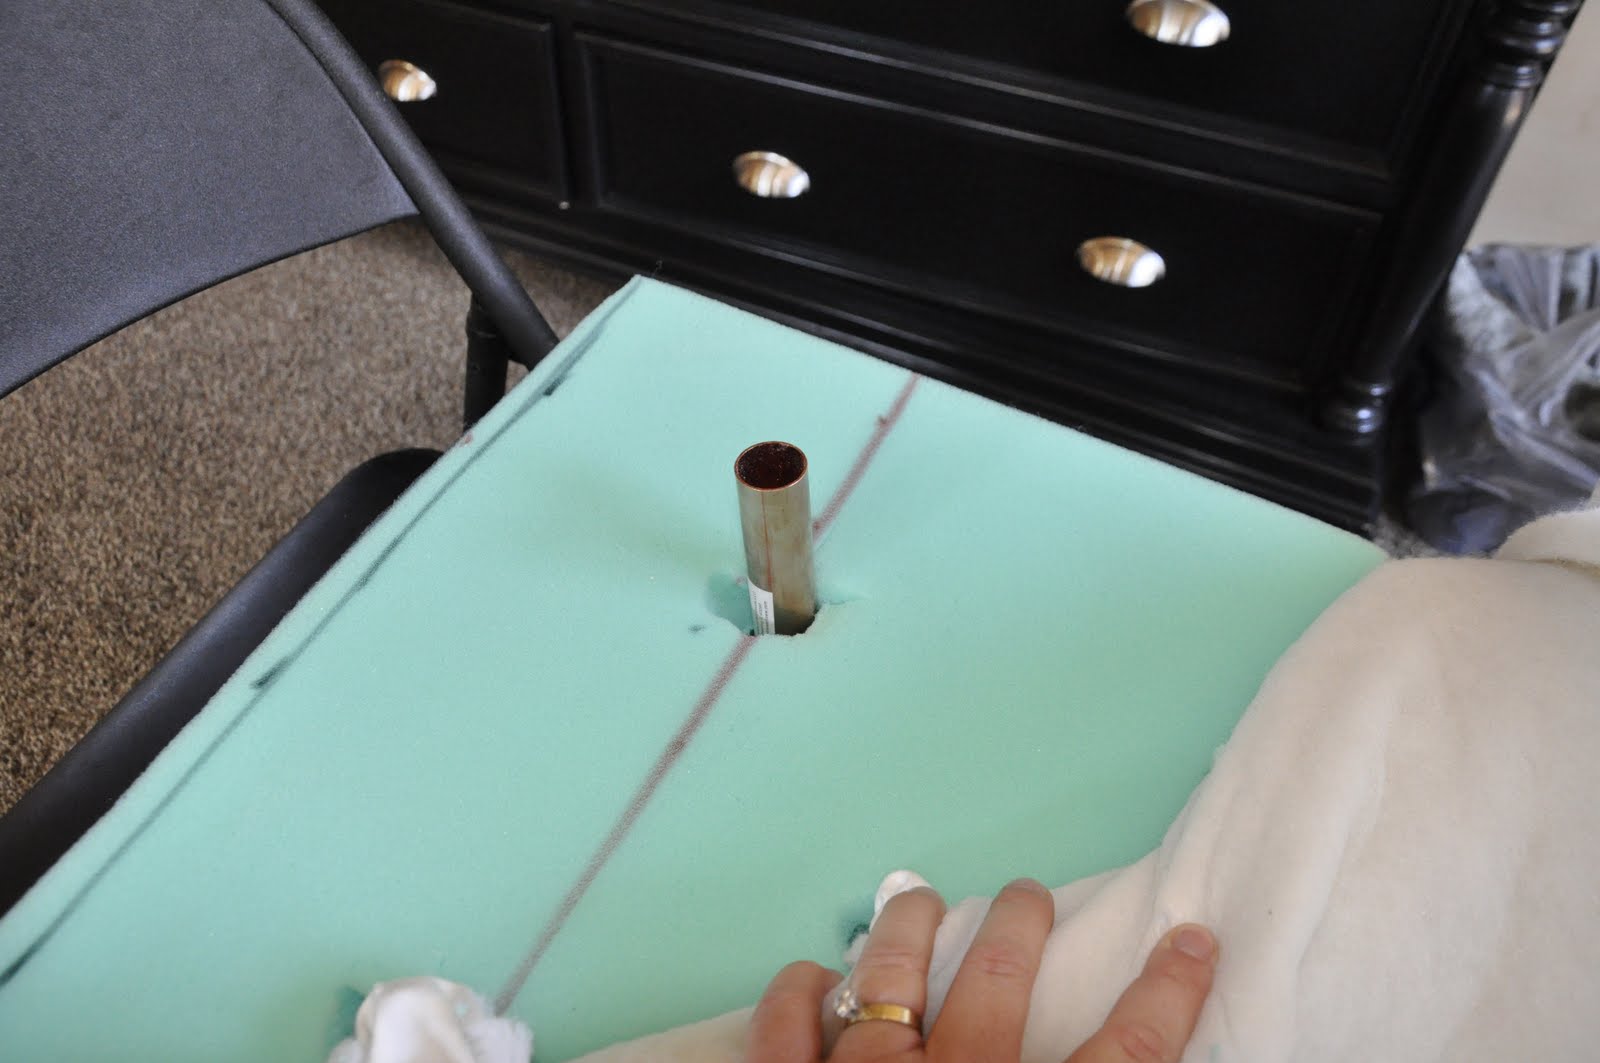
Step 6: Make the holes in your foam bigger. Take a metal piece of pipe that has a sharp edge and push it into the foam where your small drill holes are. This will make your holes big enough for your buttons.
Step 7: Set your foam on top of your ply wood and mark where the tufts will be with your pencil. Then drill holes in your ply wood to match the tufting pattern. Sidenote: You need your holes to be big enough to get your needle in through your ply wood, but you don’t want it too big or securing the tufts will be challenging. I have seen tutorials before that instructs you to glue your foam down to the board. I would advise against this. If you have a hard time finding the hole in your ply wood, it is easy to lift up the foam and easily guide it into the corresponding hole. Just be careful to make sure your foam is in the correct spot as you go.
Here is Andrea drilling the holes. 🙂 Who said girls can’t work power tools!?!?
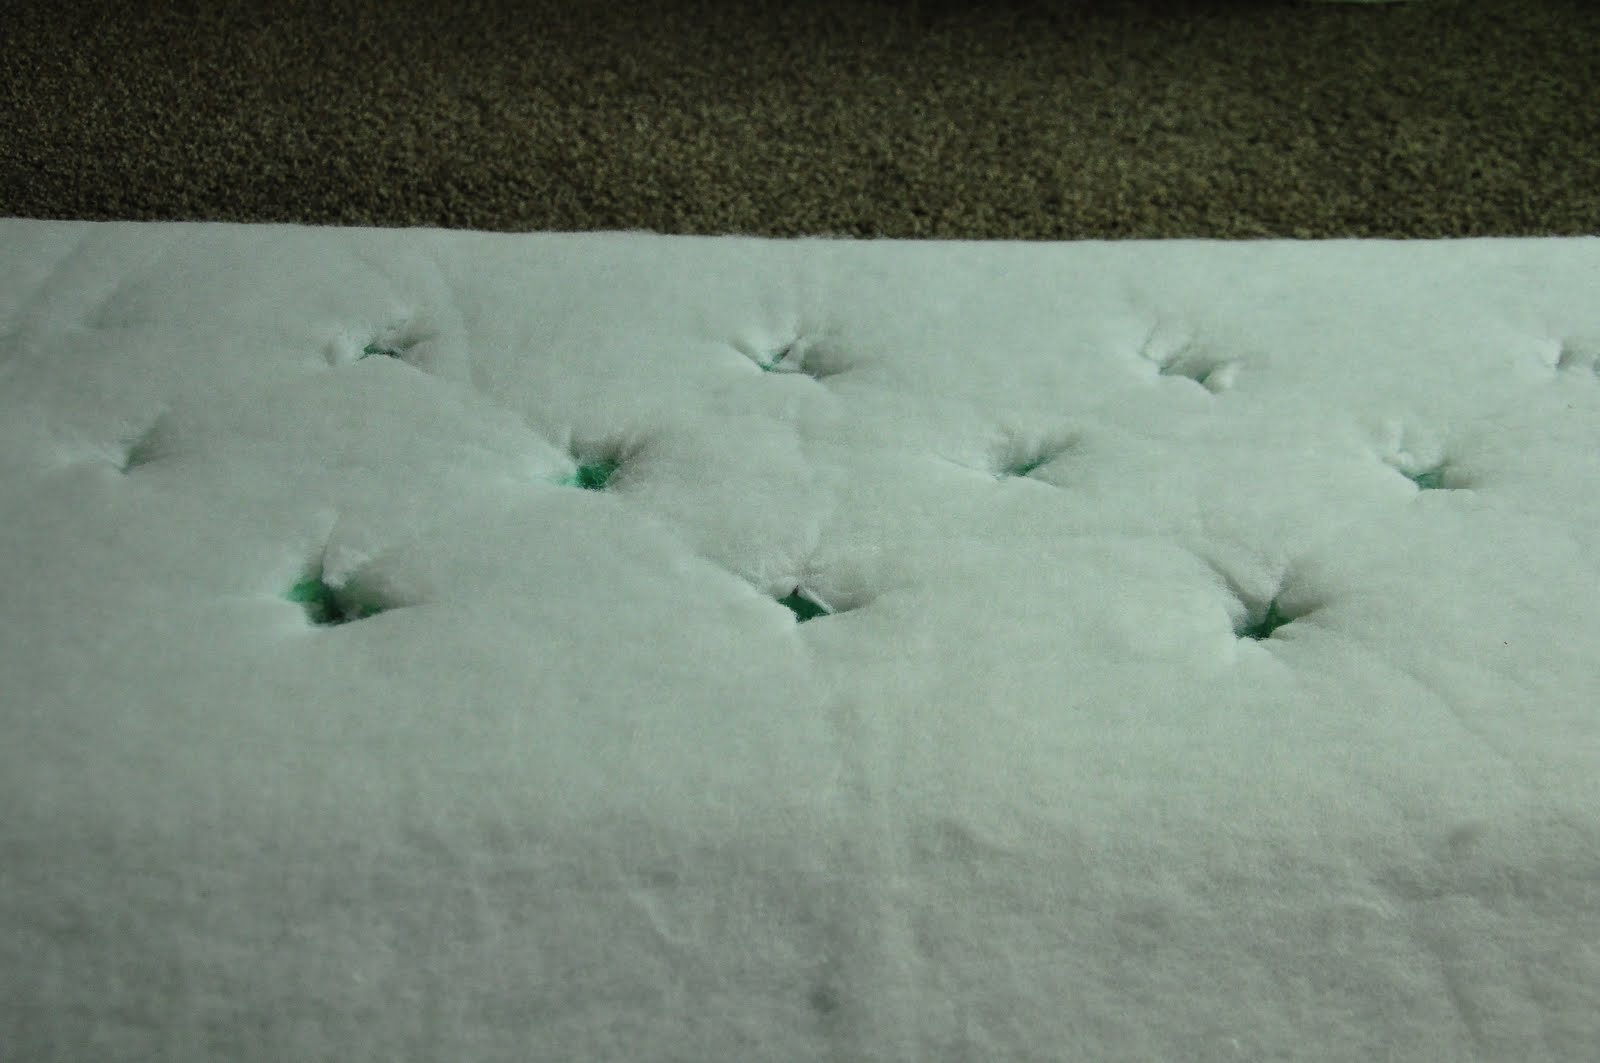
Step 8: Lay your foam back on your ply wood and cover your foam with batting and cut holes where each tuft will be.
Step 9: Cover your buttons with fabric. Note: Be picky about which fabric buttons you buy. Do NOT buy the ones from Wal-Mart. They are CRAPPY with a capital C. Also, we tried two other types and found that the better buttons were the ones on the right. They held up MUCH better than the ones on the left.
BUT…let me give ya a big warning. When you are securing the tufting along the back of the wood, you need to pull REALLY hard. During this process we pulled several buttons apart. How FRUSTRATING!! Maybe our muscles are just super-human. 🙂 No, ideally using a regular button would probably hold up better and maybe there are better fabric buttons out there. I plan to contact an upholster shop to ask because this has been a problem for several tufting projects. If I come up with a solution to this problem, I will post it. If you have a better solution, don’t hesitate to let me know.
Step 10: Lay your fabric on your foam tomake sure you have enough fabric. I would suggest to have a piece of fabric that is twice as big as your foam area. Obviously the thickness of your foam will depend on how much extra fabric you will need, but since our tufts were four inches deep, we needed a lot of extra. Remember that your fabric will need to be stapled all the way around to the bottom side of the ply wood, so make sure you have enough.
When picking a fabric, we found that large patterned fabrics look very silly. We tried four or five fabrics by stuffing the fabric into each hole of the foam before we decided on this Amy Butler fabric from her August Fields line. The large patterned fabrics looked ridiculous because the tufting created an uneven pattern. This fabric was a much better option because the simplicity of the pattern carried on with the tufting.
After we got done we wondered if a thinner fabric would have been easier to tuft with. A canvas-type fabric is what I normally recommend for upholstery, but for diamond tufting, you have a lot of creases to work with. So, we wondered if a thinner weighted fabric may have been easier.
Step 11: Let the tufting begin! Start at the middle of your board and work your way out by alternating sides. This will allow you to pull the fabric tight as you go. Put your fabric covered button onto your long straight tufting needle. Push the fabric deep into your foam and make sure your needle goes directly into the center of each hole. Push the button down until the button is basically touching the ply wood, and pull the fish line through so that it is sticking out the bottom of the ply wood. You may need pliers for this process. We used pliers and rubber gloves to help with our grip. We found it was easier to do this process if we put our project up on two chairs to create a space for us to work underneath the board.
Step 12: Secure each button on the underside of the board by having one person push down on the button from the top and tying the fish line around a small ball of cotton. The cotton prevents the fish line from going back up through the holes. You need to tie it tight. Some of our buttons came apart during this process. BUT, if you had secure buttons, it would have worked much, much better.
Make sure that each button is pulled evenly. We had one button that wasn’t pulled as deep, and it looks VERY silly (we are going to re-do that one). Each button should be almost touching the ply wood. We used larger buttons, and found that it was helpful to see the tufting, but we wondered if a smaller button would have been easier to secure. I would probably still opt for a larger button if it were me.
Step 13: Pull the fabric tight around the back and secure it with a staple gun.
Here is a picture of the underside after we got done: Just make sure that the fabric is TIGHT. You will need two people for this process, one to hold the fabric tight while the other staples it securely. Remember that no one will see the underside of the board, so staple away.
You need to be careful as you staple along the sides that your diamonds are even. You need to fold the fabric so that the diamonds continue on the sides. If you want, you can fold the fabric to have a straight fold along the side also. I have seen it done both ways.
Step 14: Secure the top board onto the bench with screws. Make sure you use screws that aren’t too long. You don’t want to sit down on your bench and get poked by a screw.
Overall, this project turned out great. It is always fun to learn something new, and my mind is spinning with possibilities.
The bench looks great at the end of her amazing bed and bedding choices.
We decided on a neutral pattern for the bench since Andrea is like me and changes her colors often. The gray in the fabric will match a lot of different color combinations.
I can’t wait to use my new skills on another project soon!
Published on August 17, 2011
36 thoughts on “Tutorial: How to do Diamond Tufting”
Awesome tutorial! I was searching for tufted upholstery, after buying a beeyootiful chair from Craigslist yesterday. Perfect timing! Thank you!
I wish I had seen this comment a couple weeks ago, I couldn’t get the “Button Kit” to hold for nothing the last two weeks, even went to an upholster & JoAnn’s Fabric for direction, I tried regular buttons & hot glued the fabric on top, then a thought came to just hot glue the fabric on the metal button maker, then hot glued the other piece of the button maker and walaa I was done. My problem was, I think, my fabric was too thick, and the button maker I bought didn’t have prongs underneath to hold the fabric in place, to snap the other piece on.
what a great post…. and I LOVE that Andrea's earrings match the power tools. I say girls can use power tools, and accessorize with them as well!! Love the end result. Thanks for more insparation!
I have used the buttons from Wal-mart since that is all I had access to, and it was horrible!! It was my first upholstery project and I was almost in tears! We finally pulled the button back and tied it all we wanted, then super glued the buttons onto the back. It worked, and it's been a few months, so hopefully it will hold up…If there's another option, I totally want to know!
I saw some HGTV show where they staple-gunned the fabric to the board, then glued the buttons down into the indentations… Never tried it before, though.
This looks really good! And I'm so glad to hear you say that those buttons didn't work that well! I had problems with them too, but I thought it was just me since it was my first tufting job… could be a combination of both! 🙂
Perfect! I'm going to be doing tufting on a chair today, so I'm glad to see your process before I tried it out. 🙂
Do you have any idea where she bought her bedding from? I've been searching for a non-girly neutral bedspread for a long time, and that one looks great from the pictures.
I'm making a diamond tufted headboard soon and had an upholstery shop make me some buttons relatively cheaply. It's worth checking into because they actually have a machine that makes the buttons and I would assume they hold up better.
What my Sister was telling about that machine that makes buttons yesterday, I was like what does she know, if these “Homemade Button” I did don’t hold up, I’m going to my nearest upholstery place
Love your room! Did you paint the furniture black yourself? I'm debating painting our bedroom furniture and the glossy black looks so nice! What paint did you use/recommend?
Upholsters use Prong Buttons to do this kind of work. this is what they look like. http://tinyurl.com/prong-button You poke the prong through your plywood and staple to the back. The down side is you need a machine and die to make your buttons like this http://tinyurl.com/button-machine
I am linking you up in my new post, but I found a great tip. Joann's sells a brand that are metal, and have this rubber tool that come with it to help make the buttons. It ensures they are pressed down all the way. However, after reading all these horror stories, I decided to use liquid nails on the buttons before I pressed the back on them (securing them). I let them sit a few hours, so they could dry. I didn't have ANY pop off during the tufting process!!
Thank you soooo much for your in depth tutorial!! It helped me tremendously!
I love this room and your website is great, it has inspire me to decorate and to diy. Do you know what color of gray was used for this project? Thank you.
Good job! I do upholstery and custom sewing, for myself and for clients.
Instead of the covered button kits, which are a little pricey AND not too heavy duty….I use 1″ fender washers from home depot. A pack of eight is about a dollar and change. Then I just wrap the heavy twine or jute that I’m using to pull the “buttons” through, and cover the washers with a little padding, and fabric, then hand stitch around the edge and at the back.
These are much sturdier for tufting and cheaper to make.
Your local reupholstery shops will make buttons for around $1.50 – $3.00 each, usually while you wait. This is the way to go if you want a quality button that holds up. Hope this helps!
Hi… as for the button thing… invest in a Handy button press or have them made at a shop… #30 is a nice size. To keep them from separating dab 4 spots of superglue where the fabric or vinyl meets the metal on the back at 3,6,9, and 12 oclock positions. let them dry for a few hours. : )
What?? My Sister was telling about that machine that makes buttons yesterday, I was like what does she know, if these “Homemade Button” I did don’t hold up, I’m going to my nearest upholstery place


Awesome tutorial! I was searching for tufted upholstery, after buying a beeyootiful chair from Craigslist yesterday. Perfect timing! Thank you!
What a wonderful tutorial. I've always known how to do tufting but could never figure out how to get it so deep. Now I know the secrets! Thank you~
Great tutorial! I love this room! I think I might put this on my Pinterest! Great post!
Good tutorial! It looks great!
Susan
I don't have the greatest luck with those buttons either. One thing that helps–a generous dollop of hot glue before you press the pieces together!
I wish I had seen this comment a couple weeks ago, I couldn’t get the “Button Kit” to hold for nothing the last two weeks, even went to an upholster & JoAnn’s Fabric for direction, I tried regular buttons & hot glued the fabric on top, then a thought came to just hot glue the fabric on the metal button maker, then hot glued the other piece of the button maker and walaa I was done. My problem was, I think, my fabric was too thick, and the button maker I bought didn’t have prongs underneath to hold the fabric in place, to snap the other piece on.
what a great post…. and I LOVE that Andrea's earrings match the power tools. I say girls can use power tools, and accessorize with them as well!! Love the end result. Thanks for more insparation!
I have used the buttons from Wal-mart since that is all I had access to, and it was horrible!! It was my first upholstery project and I was almost in tears! We finally pulled the button back and tied it all we wanted, then super glued the buttons onto the back. It worked, and it's been a few months, so hopefully it will hold up…If there's another option, I totally want to know!
Her whole bedroom is awesome! The bench adds the perfect touch. Nice job, as always!!
that…like every project you do…looks AMAZING! I really need to get gutsy and try this stuff out!
I saw some HGTV show where they staple-gunned the fabric to the board, then glued the buttons down into the indentations… Never tried it before, though.
Looks great!!
This looks really good! And I'm so glad to hear you say that those buttons didn't work that well! I had problems with them too, but I thought it was just me since it was my first tufting job… could be a combination of both! 🙂
Great job!
Wow it looks really good! Don't think I'm ready for this big of a project yet…you lost me at make sure you have a patient attitude 🙂
Perfect! I'm going to be doing tufting on a chair today, so I'm glad to see your process before I tried it out. 🙂
Do you have any idea where she bought her bedding from? I've been searching for a non-girly neutral bedspread for a long time, and that one looks great from the pictures.
LOVE this! Thanks for the tutorial… I love your whole set up. And girls can totally work power tools!! 😉
thanks for the tutorial you did a great job xxx
That is fantastic!! I've been looking for a step by step tutorial to use for my headboard. I think this one is it!!
I'm making a diamond tufted headboard soon and had an upholstery shop make me some buttons relatively cheaply. It's worth checking into because they actually have a machine that makes the buttons and I would assume they hold up better.
What my Sister was telling about that machine that makes buttons yesterday, I was like what does she know, if these “Homemade Button” I did don’t hold up, I’m going to my nearest upholstery place
Love your room! Did you paint the furniture black yourself? I'm debating painting our bedroom furniture and the glossy black looks so nice! What paint did you use/recommend?
@Jenna
No, I did not paint this furniture. This was a friends room and she bought it like this.
Isn't it so pretty?
Yes! I love it!
Thanks for the step by step tutorial. My suggestion is to use the drill in reverse, makes a nice, clean hole & foam doesn't get caught on drill bit.
Upholsters use Prong Buttons to do this kind of work. this is what they look like. http://tinyurl.com/prong-button You poke the prong through your plywood and staple to the back. The down side is you need a machine and die to make your buttons like this http://tinyurl.com/button-machine
I am linking you up in my new post, but I found a great tip. Joann's sells a brand that are metal, and have this rubber tool that come with it to help make the buttons. It ensures they are pressed down all the way. However, after reading all these horror stories, I decided to use liquid nails on the buttons before I pressed the back on them (securing them). I let them sit a few hours, so they could dry. I didn't have ANY pop off during the tufting process!!
Thank you soooo much for your in depth tutorial!! It helped me tremendously!
I love how the chest turned out! Do you know where she bought her bedding? I really need new bedding and hers is adorable!
I love this room and your website is great, it has inspire me to decorate and to diy. Do you know what color of gray was used for this project? Thank you.
Have u ever tried actually glueing the cooVered buttons to keep them from popping apart?
Yes, it definitely helps.
Hi there,
Good job! I do upholstery and custom sewing, for myself and for clients.
Instead of the covered button kits, which are a little pricey AND not too heavy duty….I use 1″ fender washers from home depot. A pack of eight is about a dollar and change. Then I just wrap the heavy twine or jute that I’m using to pull the “buttons” through, and cover the washers with a little padding, and fabric, then hand stitch around the edge and at the back.
These are much sturdier for tufting and cheaper to make.
Your local reupholstery shops will make buttons for around $1.50 – $3.00 each, usually while you wait. This is the way to go if you want a quality button that holds up. Hope this helps!
Just linked to this great tutorial in my recent blog post. Great job and thanks for the tut! ~ Lisa @ Pewter and Periwinkles
Hi… as for the button thing… invest in a Handy button press or have them made at a shop… #30 is a nice size. To keep them from separating dab 4 spots of superglue where the fabric or vinyl meets the metal on the back at 3,6,9, and 12 oclock positions. let them dry for a few hours. : )
For tufting, I find upholstery buttons with prongs to be easiest.
What?? My Sister was telling about that machine that makes buttons yesterday, I was like what does she know, if these “Homemade Button” I did don’t hold up, I’m going to my nearest upholstery place