


 During this time of year, we get a lot of questions about pumpkin carving from friends and family. We get to teach a lot of classes about how to carve pumpkins, so it seems natural to share our secrets with you too!
We have been carving a massive amount of pumpkins for seven years. Our neighbors call us the crazy pumpkin people, and we admit it, we are FREAKS. Ha ha.If you missed the pictures of our pumpkin display from last year, you can check it out HERE.
Our kids talk about carving pumpkins all year long, and I’m not kidding.. It is a fun family tradition that I hope will continue forever. I am always so shocked to hear that some families don’t carve pumpkins. Today I’m going to teach you the easiest/most convenient way how to carve a pumpkin. We have been testing different carving tools and gear for years and years, so if want a better experience at carving pumpkins this year, here is a synopsis of tools that will make your life easier.
Tools needed:
Sawzall
Drill
Dakota Products PG001 Pumpkin Gutter Pumpkin Carving Tool
Pumpkin Carving Kit – Patterns May Vary!
or Pumpkin Masters Artificial Pumpkin Carving Kit (I prefer the artificial carving kits because the knives are stronger)
Scissors
Clear tape
Saral Transfer (Tracing) Paper 12 1/2 in. x 12 ft. roll blue non-photographic
A pen
A cookie sheet
A clay loop (found in SE Pottery Tool – 8 Pc Set)
Here is a picture of our gear before we began:

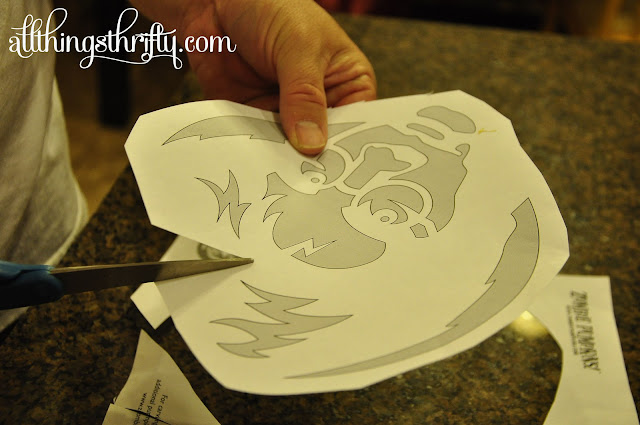
Step 1: Choose your pattern and cut it around the pattern with scissors. If you need some places to find pumpkin patterns, check out my previous post about where we get our Pumpkin Patterns.
Choosing a pattern is half the fun, and our kids love to help us decide what we will carve next.

Step 2: Cut small slits in the pattern to help the paper hug your pumpkin more easily.
Step 3: Cut a piece of BLUE transfer paper the size off your pattern. We have tried many methods of transferring the patterns onto our pumpkins, and this is by far the easiest way. We have tried other colors, and you cannot see the patterns very well. I buy mine at Amazon.com.

Step 4: Make sure that the bright blue side of your transfer paper is facing the pumpkin, and tape on your pattern. Warning: Use clear tape so that you don’t cover up your pumpkin pattern. Been there done that.

Step 5: Trace around the pattern with a pen. Press hard enough that the transfer paper will work, but not hard enough that you puncture the pumpkin.
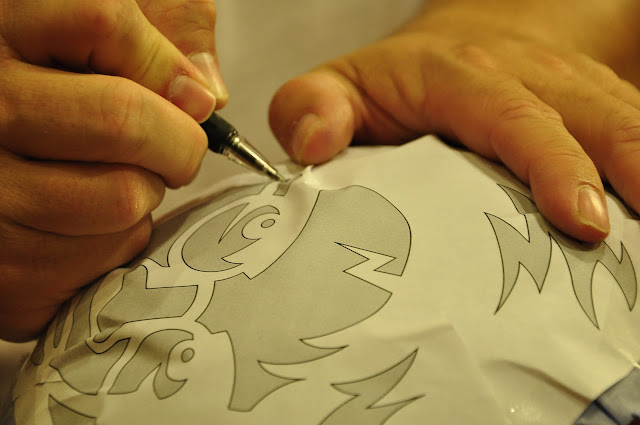
See how easy it is to see the pattern. I’m telling ya, when we found out about blue transfer paper, it was LIFE changing only because when you are carving 50-80 pumpkins a year, this stuff saves us HOURS and HOURS. We used to poke the pattern with a push pin to transfer it onto the pumpkins, but we rarely use that method anymore (only when we are out of transfer paper).

Sidenote: Do not throw away your paper pattern. We use it as a guide while we are carving. Sometimes pumpkin patterns are VERY intricate, and it is hard to see which part to cut out and which part to leave intact. If you have your pattern close at hand, it will be an easy guide for you.

Step 6: Use a sawzall to cut off the top of your pumpkin. The faster we get the top off of our pumpkins, the better, so we use power tools. (Isn’t Mr.All Things Thrifty a hunk!?!)

Step 7: Gut your pumpkin. This is the part that most people hate. If you are one of those people who cannot stand to get your hand gooey, then you need to buy a pumpkin gutter. It is the coolest invention ever! You hook it onto your drill and it guts your pumpkin for you! I love this bad boy!

Check out the pumpkin gutter demonstration on you tube. It is pretty amazing.
Step 8: Pour out your pumpkin guts periodically while you are gutting the pumpkin. Repeat until the guts are all removed. We pour our guts onto a cookie sheet so it is easily transferred into trash.

Step 9: Use a Clay Loop to thin the walls of your pumpkin. This step is VERY important!
This is what a clay loop tool looks like. It can be found in a pottery tool set. Have you ever carved a pumpkin and it is hard to get the carved pieces out after you cut them? This tool will allow you to thin the walls of your pumpkin so that when you cut the pumpkin, it will easily cut all the way through. Thinning the walls of your pumpkin will help prevent mistakes (the kind and you have to put back together with tooth picks).
We are able to cut really intricate patterns because of this step.

Hopefully you can see the tool scraping the inside pumpkin wall in this picture. We like our pumpkins to be about 1 inch thick. I promise, it will make a HUGE difference. You might even LIKE carving after you get one of these bad boys!

Step 10: Re-dump out your pumpkin guts. You will have a whole new set from thinning your pumpkin.

See how nice and clean the inside of this pumpkin is? It is now ready to be carved! By the way, the gutting process lasts less than 5 minutes now that we have the right tools.

Step 11: Start carving your pattern. Start cutting the SMALLEST parts and work to the bigger parts. Doing the cutting in this order will prevent you from breaking your pumpkin while you are carving it.
Sidenote: You can use a regular carving kit, but I suggest to use an artificial carving kit. They are MUCH stronger than the regular carving tools. Some of you may be wondering, is a carving kit necessary? YES! I’m telling you people, we have been doing this for a long time. If you want to have the best pumpkins on the block, you need the right tools. Do you saw a tree down with a steak knife? Then you shouldn’t carve a pumpkin with one either. 🙂

My husband and his brother Mike can carve a pumpkin in about 10 minutes flat.

Step 12: Take out your pumpkin parts (don’t push them in). By carving well around each individual part of your pumpkin pattern, you will be able to bring out the cut parts. It will help you prevent broken pumpkins. Believe me, we have broken LOTS of pumpkins. It is always so sad.

Step 13: After you are done cutting the pumpkin pattern, cut the lights and preview your pattern with a flashlight!

This Harry Potter pumpkin pattern is exclusively available through Zombie Pumpkins.com.
Now it’s your turn to share your Halloween projects! We have only 10 days til HALLOWEEN!

I watched the video for the pumpkin gutter – very cool – on the video the guy thin's the pumpkin walls using the tool, is there a reason you guys use the other tool for this step?
holy cow! What a process. it looks fantastic!
I stumbled on your blog and just wanted to say hi 🙂
Come on over and follow my new Color Issue blog…its all about COLOR!
xoxox,
Aarean
colorissue.blogspot.com
When my boyfriend and I moved into our house last year, Halloween was right around the corner. I thought he was CRAZY for using his power tools on the pumpkins, but apparently not! 🙂
I've always wondered what the tricks and tips people used to make those fabulously designed pumpkins! Thanks for sharing. And I sent my husband the link to the pumpkin gutter. How cool is that things??
Awesome, thank you so much Brooke for sharing your secrets. I will have to get a pumpkin gutter thing!
It is much easier to control how thin the walls are with the clay loop. We use the gutter for some of the thinning process, but the clay loop is easier to use.
I love the idea of the transfer paper. If you don't have that you can wet your pumpkin slightly, stick your template on and then use a push pin to poke/trace around the template just like you did with your pen. When you take the paper off you'll see the outline perfectly, then cut out just like you did. Going to Zombie Pumpkins for ideas, thanks.
Pinning! Thanks for the tutorial. I'm excited to carve pumpkins now!
Those pumpkins are unbelievable! I was laughing at the sawzall! 🙂
Thank you for the step-by-step. I'm from the UK so I'm relatively new to the full art of Pumpkin carving over here. I'm a little gobsmacked to see there's actually power tools for the process.
We carve swedes (rutabagas) in England. Guaranteed to keep a whole kitchen full of kids quiet and busy, scooping out a rutabaga with a bent spoon.
Ah..good times…
my husband & I have been carving intricate punkins for 10 years now- but only can manage one or two each because were doing the gutting and thinning by hand & spoon…. as well as the outlining by push tool….
WOW- you have changed our Halloween forever. Buying the blue transfer paper & the gutting tool TONIGHT. maybe well get to do more now!!! THANK YOU THANK YOU for sharing your tricks!!!
Great tutorial, Thanks for sharing!
~Mrs. Delightful
Ourdelightfulhome.blogspot.com
THANK YOU! Thank you for posting this. I pumpkin gutter? I had no idea such a thing existed. You make the process a lot less frustrating. For us, putting Christmas lights up is a job that's more enjoyable than carving a pumpkin. We adore zombie pumpkins, but often pass on the patterns because of the intricacies.
Just wondering if you have any great ideas to keep pumpkins from rotting/molding. That's our biggest problem.