As Halloween gets closer and closer, I get more and more excited because Halloween is definitely my favorite holiday. So, after Halloween last year, I bought several Halloween decorations on clearance for the following year. It’s been a great strategy, so if you love a certain holiday, if you can wait until the holiday is over before you buy decorations, it would save you literally hundreds of dollars and you would end up with a lot more stuff.
BUT…as always, if you can MAKE it, it will be CHEAPER and a lot of times much CUTER than a store bought item. In my opinion this is a huge WIN, WIN situation.
I’ll try and keep my instructions simple. Feel free to e-mail us at allthingsthrifty@gmail.com if you have questions. I call these windowkins (pumpkin patterns for the window).
Items you need to make windowkins:
Black butcher paper or black poster board (poster board is actually easier)
an exacto knife or scissors for black butcher paper
yellow tissue paper
a white crayon
tape
a pumpkin pattern (downloaded from the internet)
a projector to hook to your computer (this is sooooo much easier to do with this item, but I guess if you have the ability to copy it over into a larger scale by eye…more power to ya.)
Black butcher paper can be bought at Robert’s crafts for 17 cents a foot. So, for a 12 foot piece I paid a whopping 2.04. But, when I’ve made them in the past with black poster board it was much easier…so, you decide what you would rather do.
I got the patterns from Zombie Pumpkins, if you would like the same patterns, you can get to the site by clicking HERE.
After I picked several patterns, I got to work tracing the patterns onto the black paper by hanging the paper onto the wall in my garage and projecting the patterns onto the paper. (I pulled up the patterns on my laptop and hooked up a projector to the laptop). WARNING: make sure that you know the size of your windows before you project the pattern onto the paper. You want to make sure that the pattern isn’t too big or it won’t fit in your window. Also, I used a piece of white crayon to trace the patterns because it was much easier to see later.
Next, use your scissors or an exacto knife to cut out the indicated areas of the patterns.

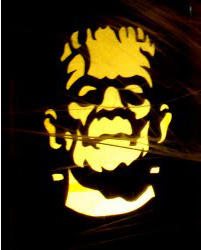
After your patterns are cut out, tape yellow tissue paper to the back like this:

All you have left is to hang them in the window and black out the rest of the window with remaining butcher paper.
I am a little bit of a Halloween freak…as the next several posts will probably illustrate, but I put up a bunch of spider webs across the outside of the house, so the pictures are a little fussy because of the “webs” hope you get the idea.
They are REALLY cool and glow great at night.


By the way, I’ve used this concept for parties too. Check out my Twilight windowkin!

Shut up! That is amazing, I can't belive how much time that must have taken.
Wow. This is incredible, thanks for the great ideas. I just wrote an article about thrifty halloween decor on our blog at FaveCrafts – they're a bit more amateur than yours though 😉
http://www.favecraftsblog.com/how-to-make-halloween-decorations-using-everyday-things/
Happy Halloween!
Kristen
Editor
FaveCrafts.com