Me and thrift stores have this weird connection: I think up some treasure in my head that I want to get my hands on, and miraculously during one of my quick “drive-bys” at the thrift store after work, there “IT” is, as if someone donated it just for me.
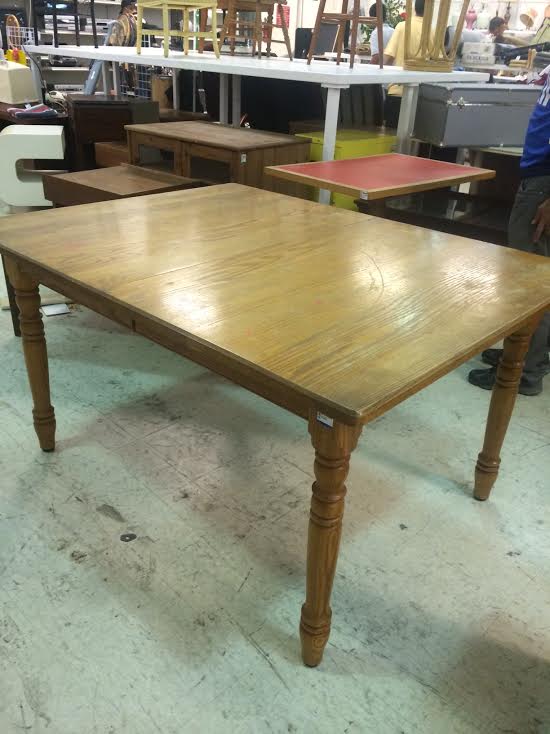
That’s what happened with this $30 solid, thrifted table that I hacked and stenciled for my latest DIY project. (Yes, just $30!!)
Before I show you how I transformed this awesome piece of furniture for my recent pretty little laundry room makeover, let me introduce myself. 🙂
I’m Serena from Thrift Diving, a blog that inspires you to decorate, improve, and maintain your home on a DIY budget (read: WE.LOVE.THRIFT STORES!). Although I’m a mom to three young boys and work a full-time “day job,” every day I try to squeeze whatever little time I have left into my passions: my blog and its readers, power tools, and making over thrift store furniture.
I’m stoked to be here today!

Okay, so back to this lovely piece of furniture I scored and how I transformed it…
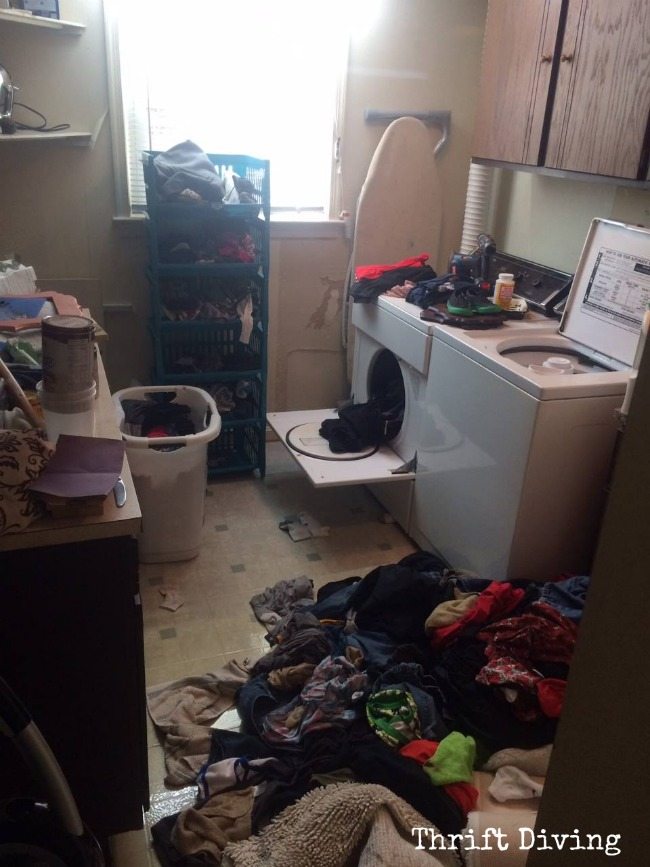
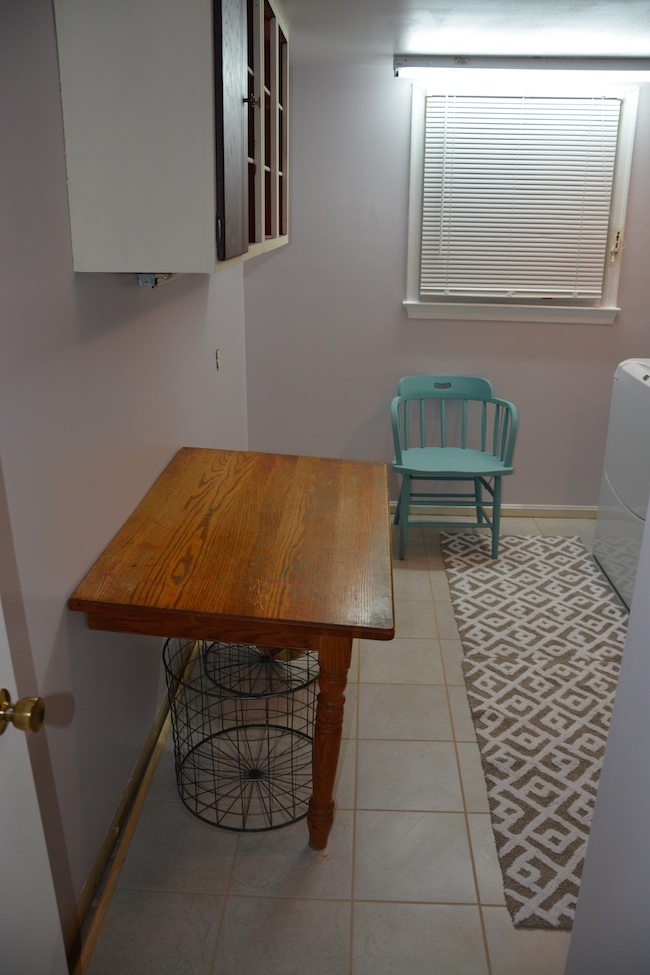
So…last month I put a call out to all my readers to join me for my 30-Day June Room Challenge, where we would each commit to making over just ONE room in our house in 30 days, and we’d be each other’s cheerleaders for the month. Me–I chose my laundry room. This is what it looked like just over 30 days ago. Shocking, huh?
BEFORE
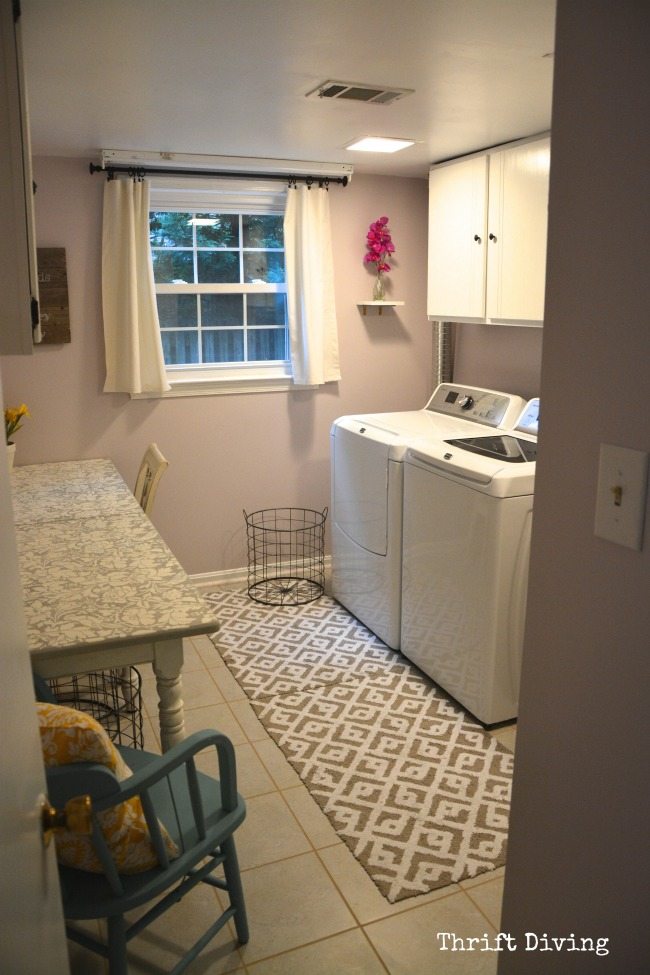
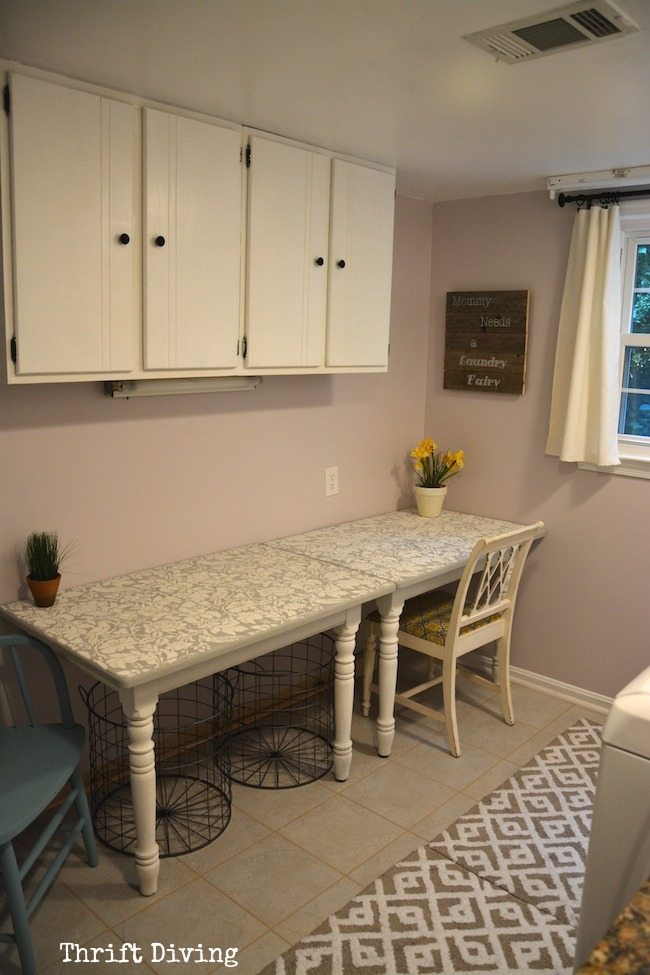
At the end of the challenge, it looked like this!!
AFTER
That table was critical to my laundry room makeover because I needed two things 1) more folding space, and 2) the ability to store dirty laundry baskets underneath of it and out of plain sight. I crossed my fingers and hoped that the vision could make the table look amazing. Thankfully, it turned out almost perfect! ;). Now I’m going to show you how I did it. (Subscribe to my YouTube channel, where I’ll soon be posting the video tutorial of this project, and more!).
How to Hack and Stencil a Thrifted Table
It’s not difficult to hack a thrifted table to suit your decor needs, but here is what you’ll need to do to achieve the look:
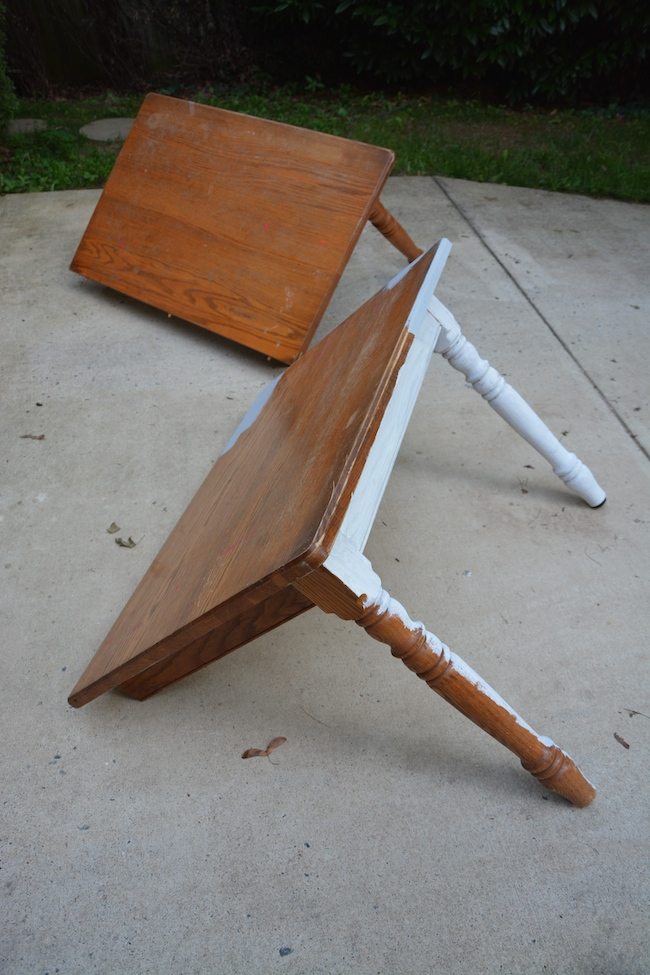
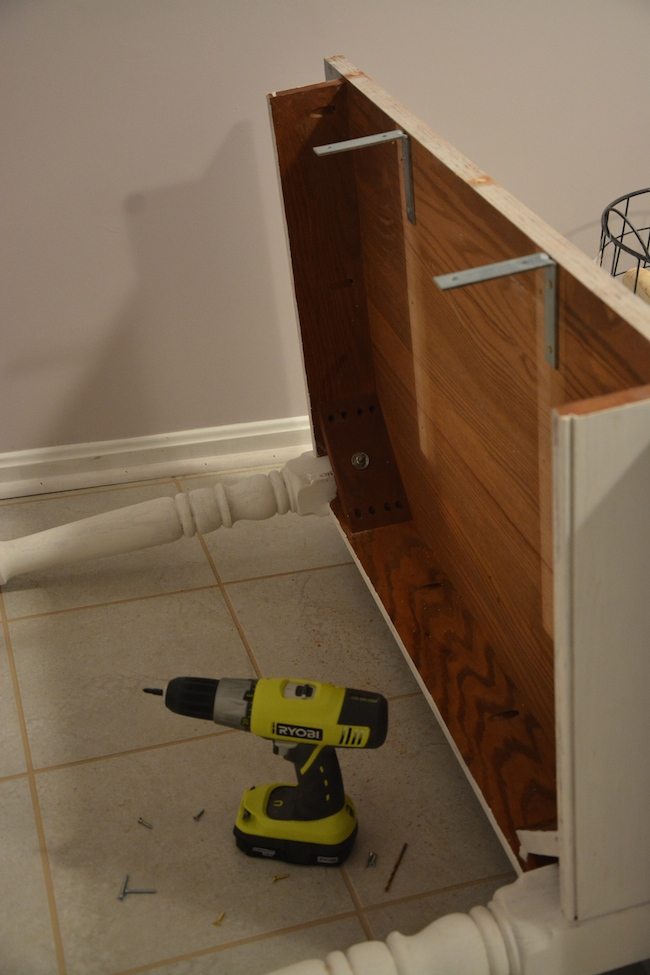
STEP 1: Don’t Choose Just Any Table
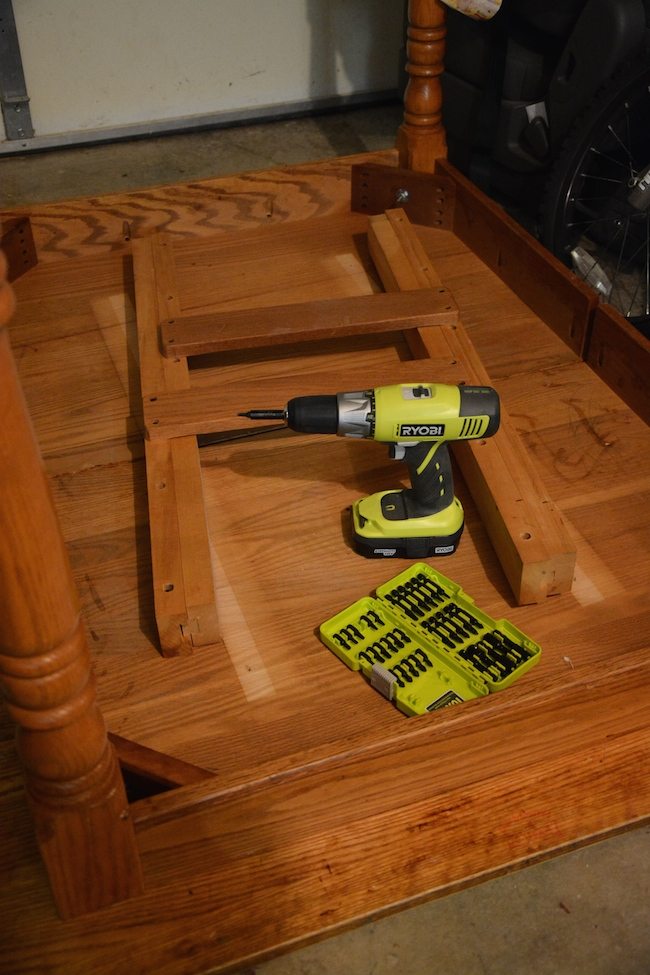
To hack a thrift store table into two halves, you don’t need to pull out a circular saw. All you need to do is look for tables that have a leaf in the center. When you remove the leaf, you’re left with brackets on the underside that are easy to remove with a simple drill!
STEP 2: Trial and Error!
Might be a good idea to test the separated table pieces to make sure it will fit in your space. Here I lugged it into the laundry room to make sure I could pull this off!
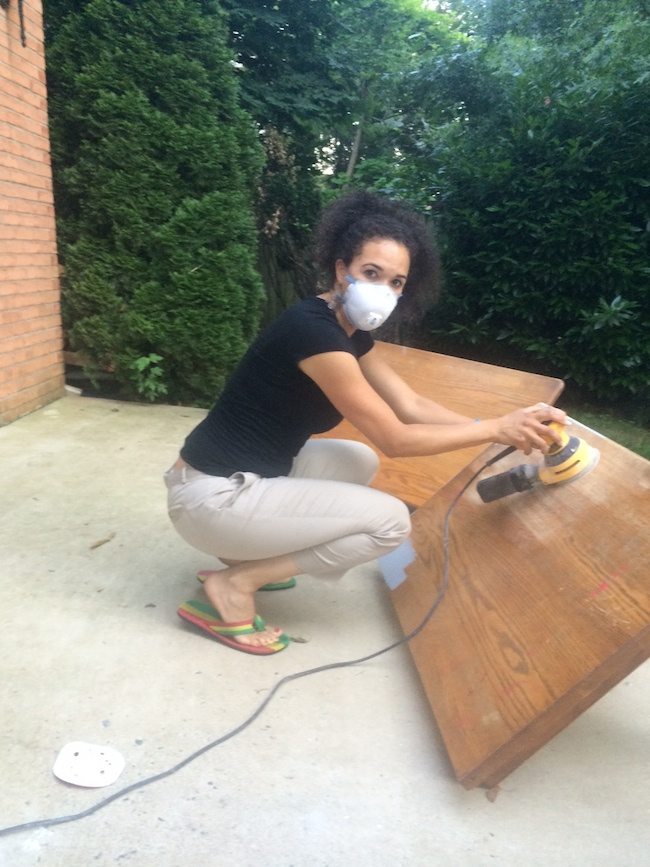
STEP 3: To Sand or Not To Sand?
Generally if you’re working with Annie Sloan decorative chalk paint (as I was in this case), you won’t need to sand. However, it had tons of deep scratches and icky-sticky stuff that only sanding could take off!
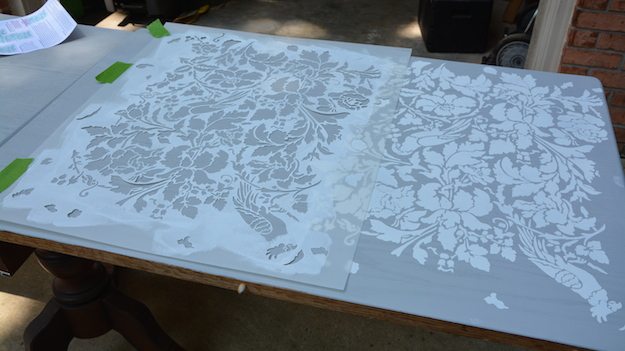
STEP 4: Stencils Everywhere!
Paint the body and the top. I love having a different color on the legs (Annie Sloan Pure White on the body, and Paris Grey on the top). Next, lay a stencil down. I’m using a floral damask one from Royal Design Studio.
STEP 5: Get Some “L” Brackets
To hold the table up against the wall, use L brackets to attach to the underside of the table. Then mount to the wall. You can use the studs in the wall, or just drill holes and use those nifty little anchor thingys :).
STEP 6: Enjoy Your New Table!
For not a lot of money, you now have an awesome, long table! It’s really like getting two tables in one. I love how mine looks in my new laundry room! Finally Mommy has a beautiful place to wash clothes!
Join My “August Upgrade” Room Challenge!
My laundry room was transformed as part of my Room Challenge series over on Thrift Diving! You’re just in time to join Round 2! The August Upgrade Challenge starts soon, so don’t miss this opportunity to finally take on just one room in your house that causes you stress and anxiety! Commit to totally transform , decorate, or declutter one room in 30 days! CLICK HERE to join the challenge! (It’s free, and I guarantee you’ll have a great time and meet new friends!)
More Thrifted Furniture Hacks!
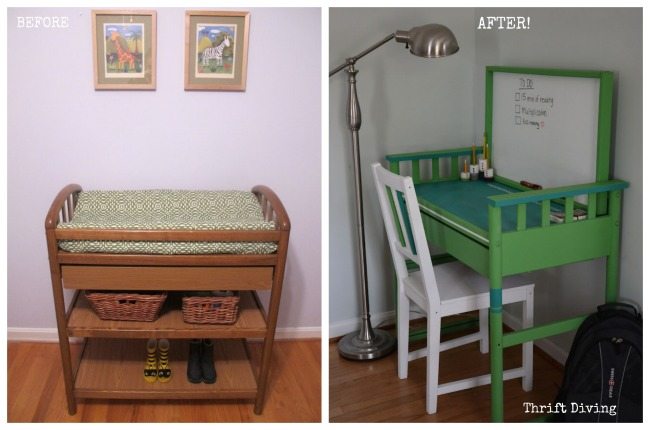
If you enjoyed this project, consider SUBSCRIBING to Thrift Diving! Would love to have you! Get a free eBook when you subscribe: 7 Thrift Tips Your Mama Never Told You. Feel free to check out my project gallery and articles, but here’s one of my favorites! I turned a changing table into a desk for my oldest son, which was only $12 at the thrift store!
Have you ever hacked a piece of thrift store furniture? Leave a comment below and let’s chat about your project!
Looks great! I just had my first experience with chalk paint the other day and I love it! What a great way to turn a regular table into a long table!
That’s great to know that you like chalk paint, Sami! I’m nervous to use it, but can’t wait to. It’s on my to-do list! Keep an eye on my blog for a possible tutorial coming up???
Thanks for posting this beautiful post, Serena!
From your whole food-y!
Janie Lynn
Well that’s just genius! (and beautiful!)
Thank you, Sami and Michele! 🙂
I was at your TD blog about 1am. admiring your beautiful laundry room makeover! You did a FAB job.
The folding table/table redo is amazing. Love the snap tile idea too…may still that one for my laundry room. 🙂
Are you loving the W/D? I’m going back with a top loader when the time comes.
Hey Jake! (love that name!), how awesome you were on my site! 🙂 Yeah, the SnapStone is awesome because you don’t have to remove your existing floor. Since my house is older (1973), I don’t know what in the world I would find underneath that tile! LOL. As long as your floor is in good condition. Be sure to check that it’s level before laying the tile, though, or it could crack. I’ll be posting the video tutorial of the installation hopefully this weekend! And yes, LOVING the new W/D! My old one barely worked, so it was like soaking our clothes for 30 minutes, then having to dry for 140 minutes because the dryer was so old! HA! 🙂 Thanks for commenting!
I got inspired by the wall stenciling on this site, and decided to do one wall in the living room. It took a month bcoz I was short of some items and even got demotivated as it was too much of work for me….. but saw this post and decided to finish the job! The wall behind our sofa looked terrible for sometime (half done) but now once it’s over it looks awesome!!! Only thing I did new was I added some flat back crystals to my wall it looks very elegant now…
Maity, that’s great!!! There’s nothing more stressful than seeing our half-finished projects done, huh?! You should totally join my 30-Day August Upgrade Challenge! If you have another space in your house you want to transform, let’s do it together in the challenge! 🙂 We’d love to have you over at Thrift Diving :). Great work!
ooh I love that tip. A lot of people are afraid of power tools, this gives you a nice option!!
Yeah, I’m STILL a little afraid of some of them! But yeah, all you need for this is a drill or a screw driver! I see a lot of these tables at the thrift store, with the leaf in the middle! 🙂 Glad I could help!
Serena @ Thrift Diving
What a great idea! I love how she was able to get twice as much space {both surface/working space and space within the room} by halving the table, and those rugs are just gorgeous!
Thanks so much, Kristen! When I first was planning it, I was thinking of making the table taller, the same height at the counter. But this works well, too, since it’s the perfect height for little guys to help Mommy! I love sitting down there now with my iPad and folding with entertainment 🙂 Thanks for the comment!!
Serena @ Thrift Diving
This is GORGEOUS!! pinning- xo
Tanya
Thanks so much, Tanya!!!
Oh my goodness girl, that table hack rocks!! Your efforts TOTALLY paid off!!
This is exactly what I need to have happen in my laundry room! Thanks for the push I needed to get ‘er done!