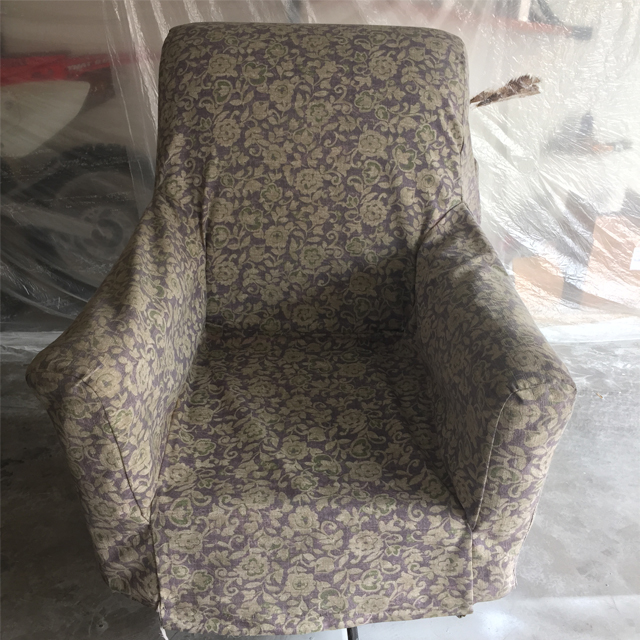
You know that ugly chair that has good bones but is too embarrassingly homely to keep anywhere that others can see it? You may have handed it down to your newly married kids who can’t afford new furniture. Or, you may have donated it to your neighbors. It looks something like this:
GO GET IT BACK!
NOW!
TRUST ME.
Tell them you’re sorry for pawning it off on them, and to make amends, you’d like to take it off their hands.
If your situation is like mine, your “giftee” will be unwilling to relinquish what has become their favorite ugly chair, so there may be some begging and bribery involved.
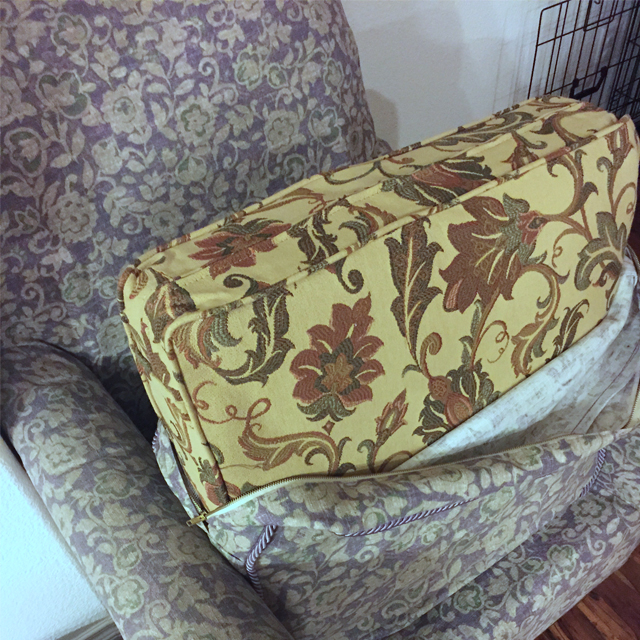
You may find that under the horrifying slipcover, another, slightly less hideous fabric awaits…
I’m about to BLOW YOUR SOCKS OFF with the most awesome (not to mention super quick and super easy) way to transform your chair, so kiss that awful upholstery goodbye…
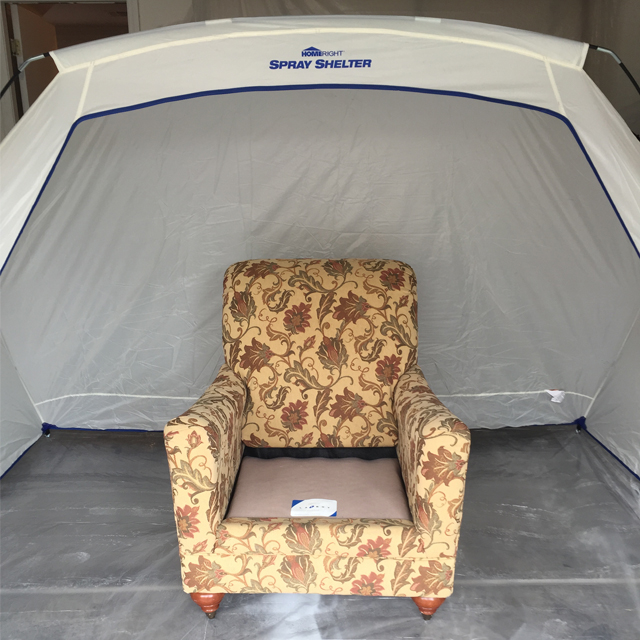
…and cue the goosebumps, because in the time it takes to make dinner, you’re going to have this:

If you don’t already have a Homeright Spray Shelter, I’m telling you you’ll want one! It pops up fast, easily fits you and your project, and saves a TON of time since you won’t have to cover a single thing in plastic.
For this project, I used my all-time favorite Homeright Finishmax sprayer. I have used other sprayers in the past, and they just don’t compare when it comes to a nice, even spray consistency, price, ease of use, and cleaning. You don’t need a separate compressor, which is nice because compressors are loud and a pain to lug around.
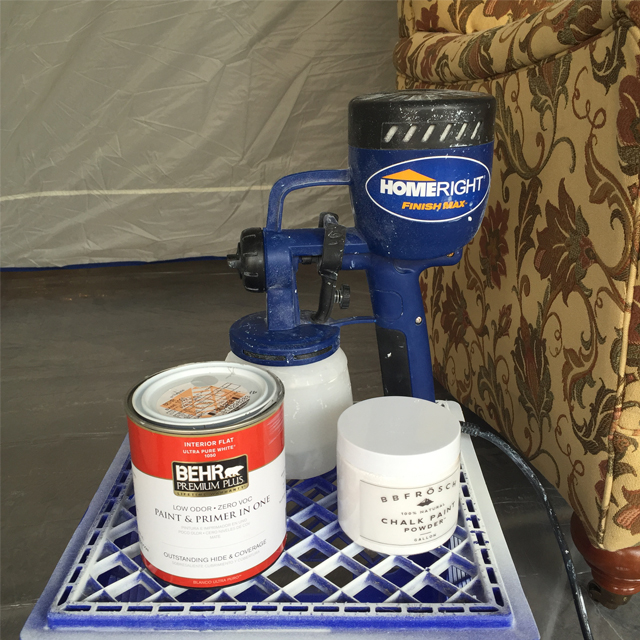
I used BB Frösch Chalk Paint Powder mixed with flat Behr paint in a gorgeous grey to make my own rich and creamy chalk paint. I love how affordable BB Frösch is over premixed chalk paint, and I REALLY love being able to pick any color I want. I used just over half a quart of paint. Click here for easy to follow instructions on mixing your own chalk paint.
Depending on the size of your project, you may need a little more or a little less paint. The nice thing about BB Frösch is, you can mix up only as much as you need, so there is really no waste.
When using chalk paint in a sprayer, you will need to thin it slightly with water. I used about 2 1/2 tablespoons of water for 1/2 quart of mixed chalk paint. Because paint brands vary, you may need to play with thinning a little bit.
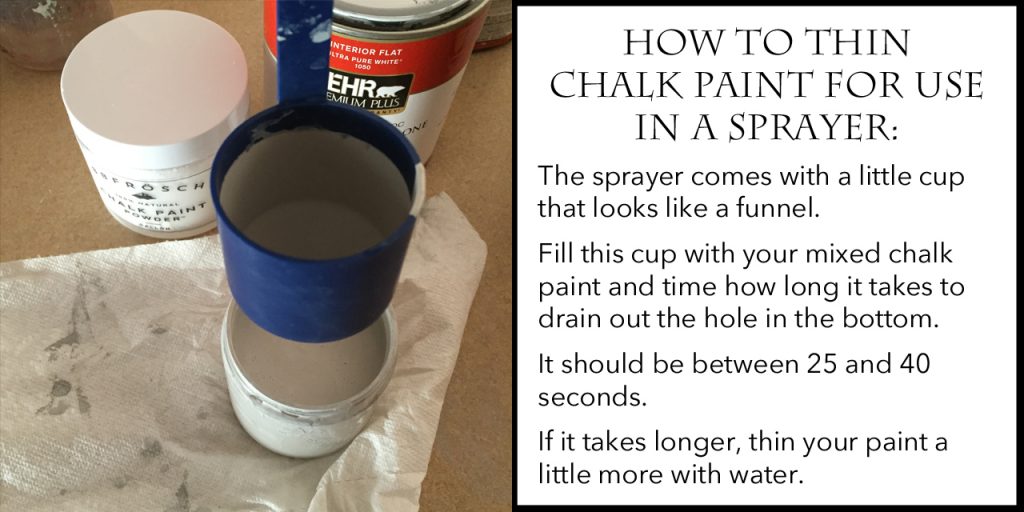
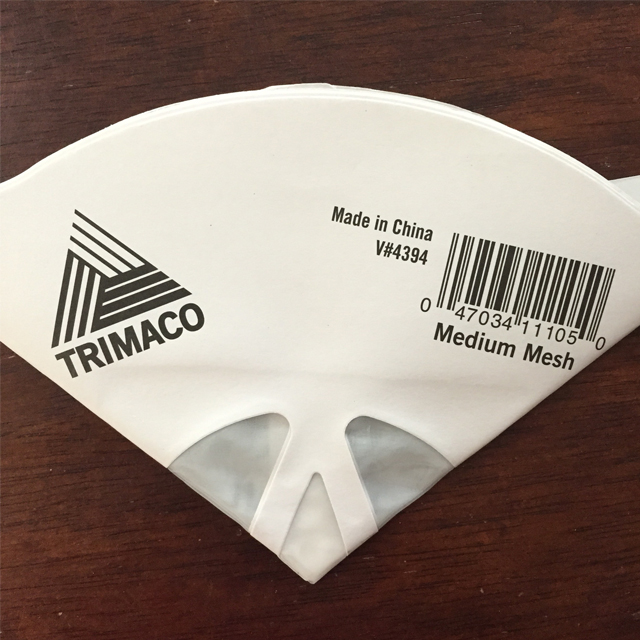
I also recommend straining your paint with cheesecloth, a paint straining bag, or a paper paint straining funnel, like the one below, just to ensure your paint will flow smoothly through the sprayer.
It doesn’t get any easier than this, people!
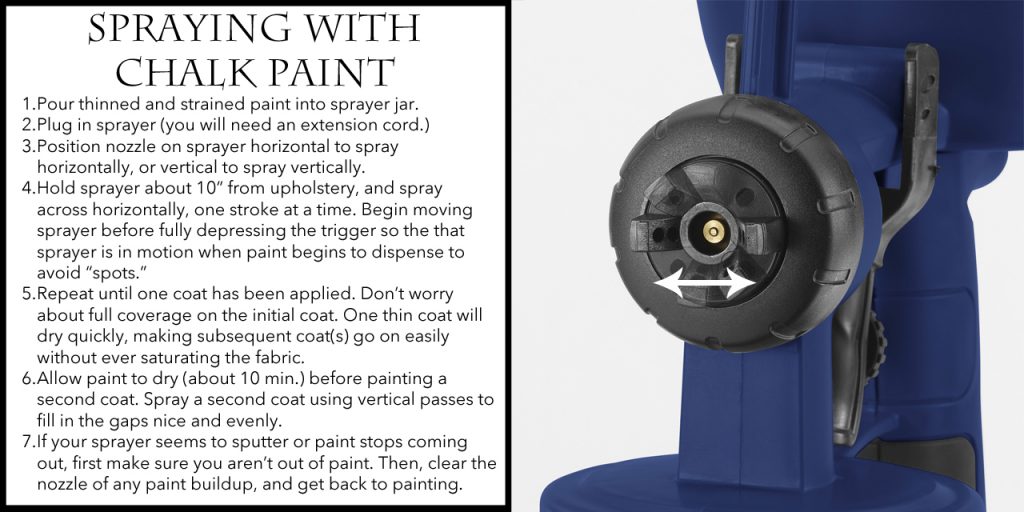
Another reason I prefer the Finishmax sprayer over a gravity-fed one…
There were times I found myself tipping the sprayer, and the paint did NOT spill out the top like with a gravity-fed sprayer! YAY!
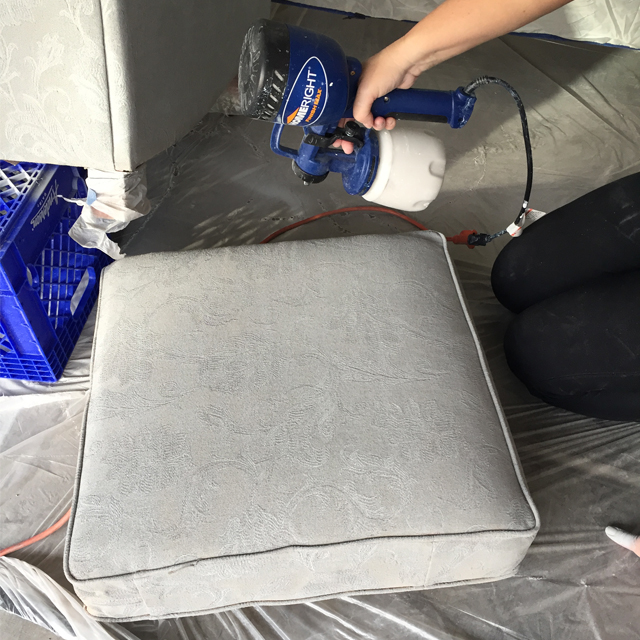
I found that using a sprayer instead of a brush on upholstery gave me a nice even coat without saturating the fabric. This allowed the upholstery to dry super fast. I only needed two coats on this chair, and it took about 1 hour for both coats, including dry time. You can see from the picture below that the coverage with just one coat was incredible!

Once the chair was fully dry, it was time to wax.
DO NOT SKIP THIS STEP!
Your chair will be gorgeous, and you will want to sit in it and begin to enjoy it, but you MUST wax it first! This will protect your fabric, making spills a breeze to clean up. Plus, the wax makes it feel like soft leather—especially over time.
I always use BB Frösch Premium Finishing Wax because it goes on like butter, and it dries and cures in minutes!
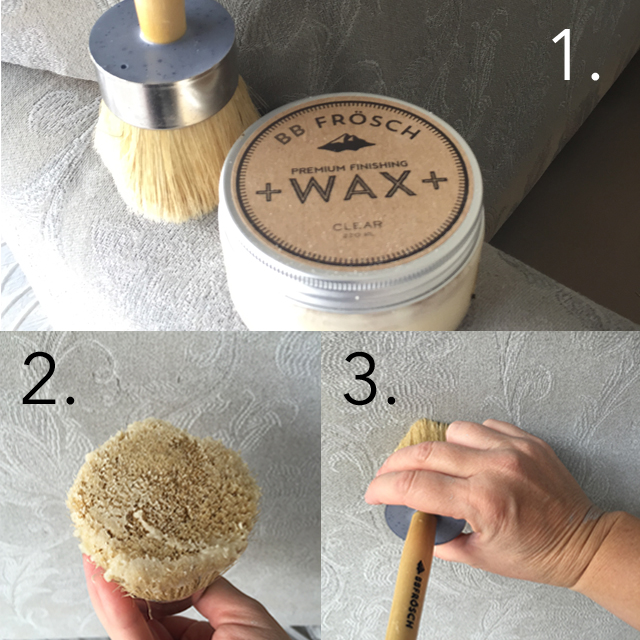
Spread a thin layer of clear wax to the end of your wax brush, and apply in circular motion. A thin layer of wax should cover about a square foot area. It may be difficult to see what areas have wax, and what areas don’t, so use the touch test as you go to make sure you get full coverage.
After applying wax to each section, use a lint free wax cloth to remove any excess wax. You will know when excess wax has been removed because the area will feel nice and smooth, not tacky.
You can apply a second coat of wax if you want extra protection, but I rarely do. I find one coat is enough.
You can also buff your wax with a lint free wax cloth to add a little shine and give it a little more of a leather look.
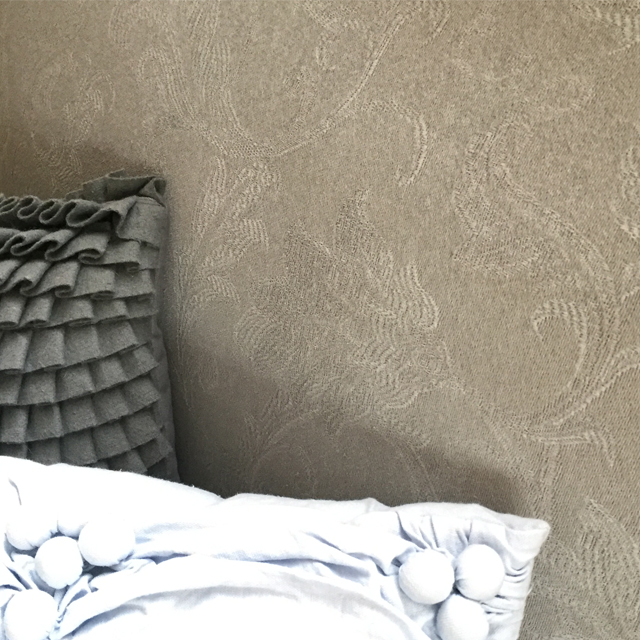
This project went so fast, I was able to get the whole chair painted, waxed and in place in time to snap a few pictures before the sun went down!
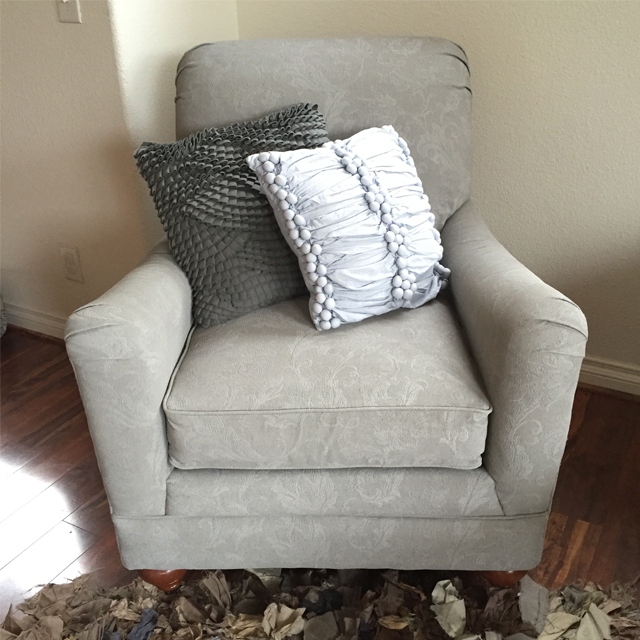
I am thrilled with the look and texture! It looks much like a soft embossed suede or leather, and it feels fantastic!

I KNOW YOU ARE DYING TO KNOW…
How does it feel?
How does it hold up?
Does it crack?
When done correctly (i.e. thin, non-saturating coats of chalk paint followed up with WAX to protect), it will NOT crack, it will clean nicely with a damp cloth, and it will feel like soft leather!

Looking for more BB Frösch Inspiration? Check out BB Frösch on Facebook, Pinterest and Instagram.

This looks amazing but the final picture brought a question to my mind- what about the folds in the fabric, how did you get the paint in those areas with the sprayer?
I know I would finish and be like-doh! I didn’t get paint under there, then it would always bother me that I could see a faint site of the original fabric coloring.
I love the transformation of the chair! It inspires me to try this technique on an older chair that I inherited.
Where did you get the pillows from? I absolutely LOVE them — it’s a nice finishing touch!
This is amazing!! Im scouring my classified ads for ugly chairs! One question, what is the smell like? Does the chair smell like paint and if so does that ware off after how long? Thanks for sharing!!
I’m also interested in these questions.
This is so beautiful! That chair turned out amazingly!
Paige
http://thehappyflammily.com
This is amazing! I have a couch that I love but hate the color. It’s microfiber would it work on that material?
I’m interested to see how it holds up over time. Another blogger painted a couch with poor results. This is a nice contrast.
This turned out so cool looking. I need some new chairs in my bedroom but I can’t really shell out a ton and this is like the best option ever!
This is GENIUS! I’ve been looking for a cool way to redo my chair from my grandma and this will be perfect! =)
This looks fantastic and I will definitely do this one day. Question: why do you need chalk paint as opposed to regular paint?
This is a really really good guide, I am wondering how can you make your NEW chair like this, thanks for sharing
Wow, that looks so great. Wish I had a sprayer =)
Heello gr8 to c ur turn out!am also thinking to paint my chair.. just a quick question..i saw on some other blog tht they suggest to use paint with out primer in it…do u find any difficulty using paint with primer? Or how about latex with satin?
Thx
If I were to sit in that chair often (every day for a couple hours), would the wax wear off on my clothes?
Joan–
The wax seals and protects the surface. It does not come off once it is dried and cured (BB Frösch wax dries and cures within about 15 minutes after applying it.)
Amazing! I want to sit in that chair with my coffee and a good crossword! I popped over from Better After. 🙂
What a novel and exciting project! Thank you for sharing.
I have a couple of chairs I was getting ready to dump and would love to try this, but my upholstery fabric has some texture. Do you know if chalk paint and wax work on a non flat surface?
Patti, search “never paint a couch” and you will find out what happens to fabrics like that. 🙂
Never paint velvet was her conclusion. Low or no nap fabrics are fine.
I need a good sprayer for latex paint. Is there one you prefer to use?
Thanks a bunch,
Kara–
I have used MANY sprayers, and the one I like the best is the Homeright Finishmax. They have a new one out that is a little more expensive, but you don’t necessarily need the extra nozzles it comes with. I like it because it doesn’t need a separate compressor and the spray is consistent. It is the one I used in this post.
Did you wet the fabric first. I see that in a lot of other tutorials. Also do you use flat paint with primer or just plain flat paint?